Orchid Care: Light, Water and Reblooming
Filip Leszczyński 15 October 2026 12 min read
In this article
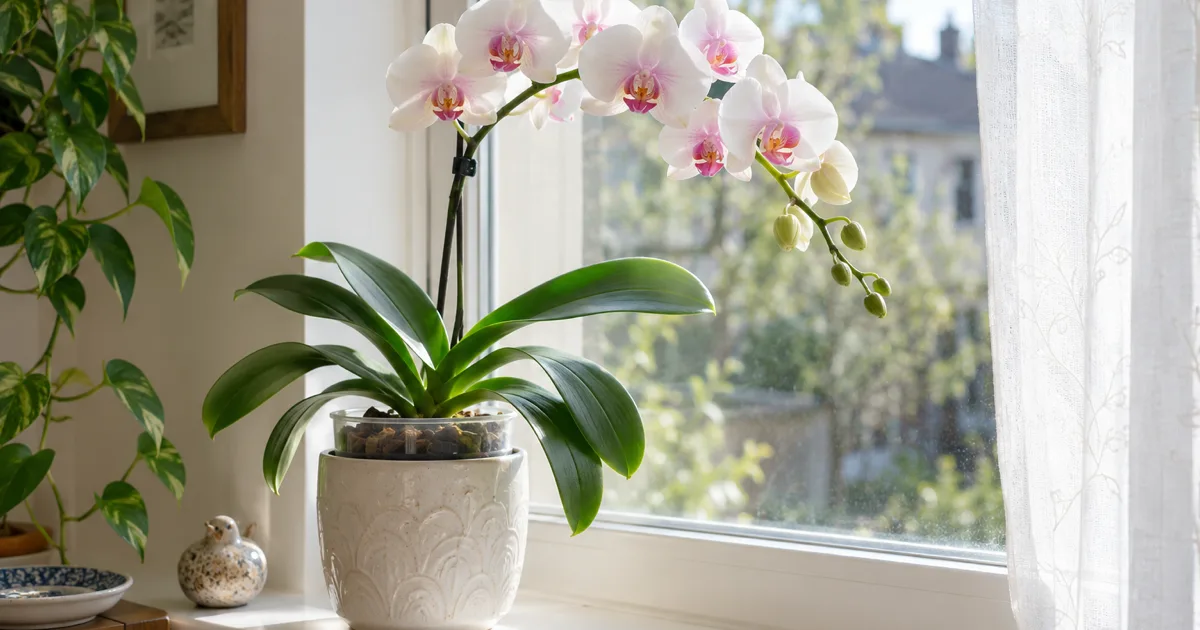
Orchid care starts with knowing which orchid you have. For a moth orchid (Phalaenopsis), aim for bright indirect light, an airy orchid mix and thorough watering when the potting medium is approaching dry. Silvery roots and a light pot help you decide; root color alone is not a watering instruction.
A clear nursery pot helps you compare root firmness, moisture in the mix and pot weight without disturbing the plant. Unlike orchids with water-storing pseudobulbs, Phalaenopsis has no such reserve, according to University of Maryland Extension. Do not treat it like a drought-tolerant succulent or cut off healthy aerial roots simply because they grow outside the pot.
This guide covers moth orchids. Other orchid groups, like Cattleya or Oncidium, want different light and watering, so check their own care sheets.
How do you take care of an orchid plant?
Put it near a bright east or west window, check the mix and roots before watering, feed it lightly while growing, and keep it at normal room temperature. That is the whole routine. The rest of this article is how to read the plant so you know when to change it.
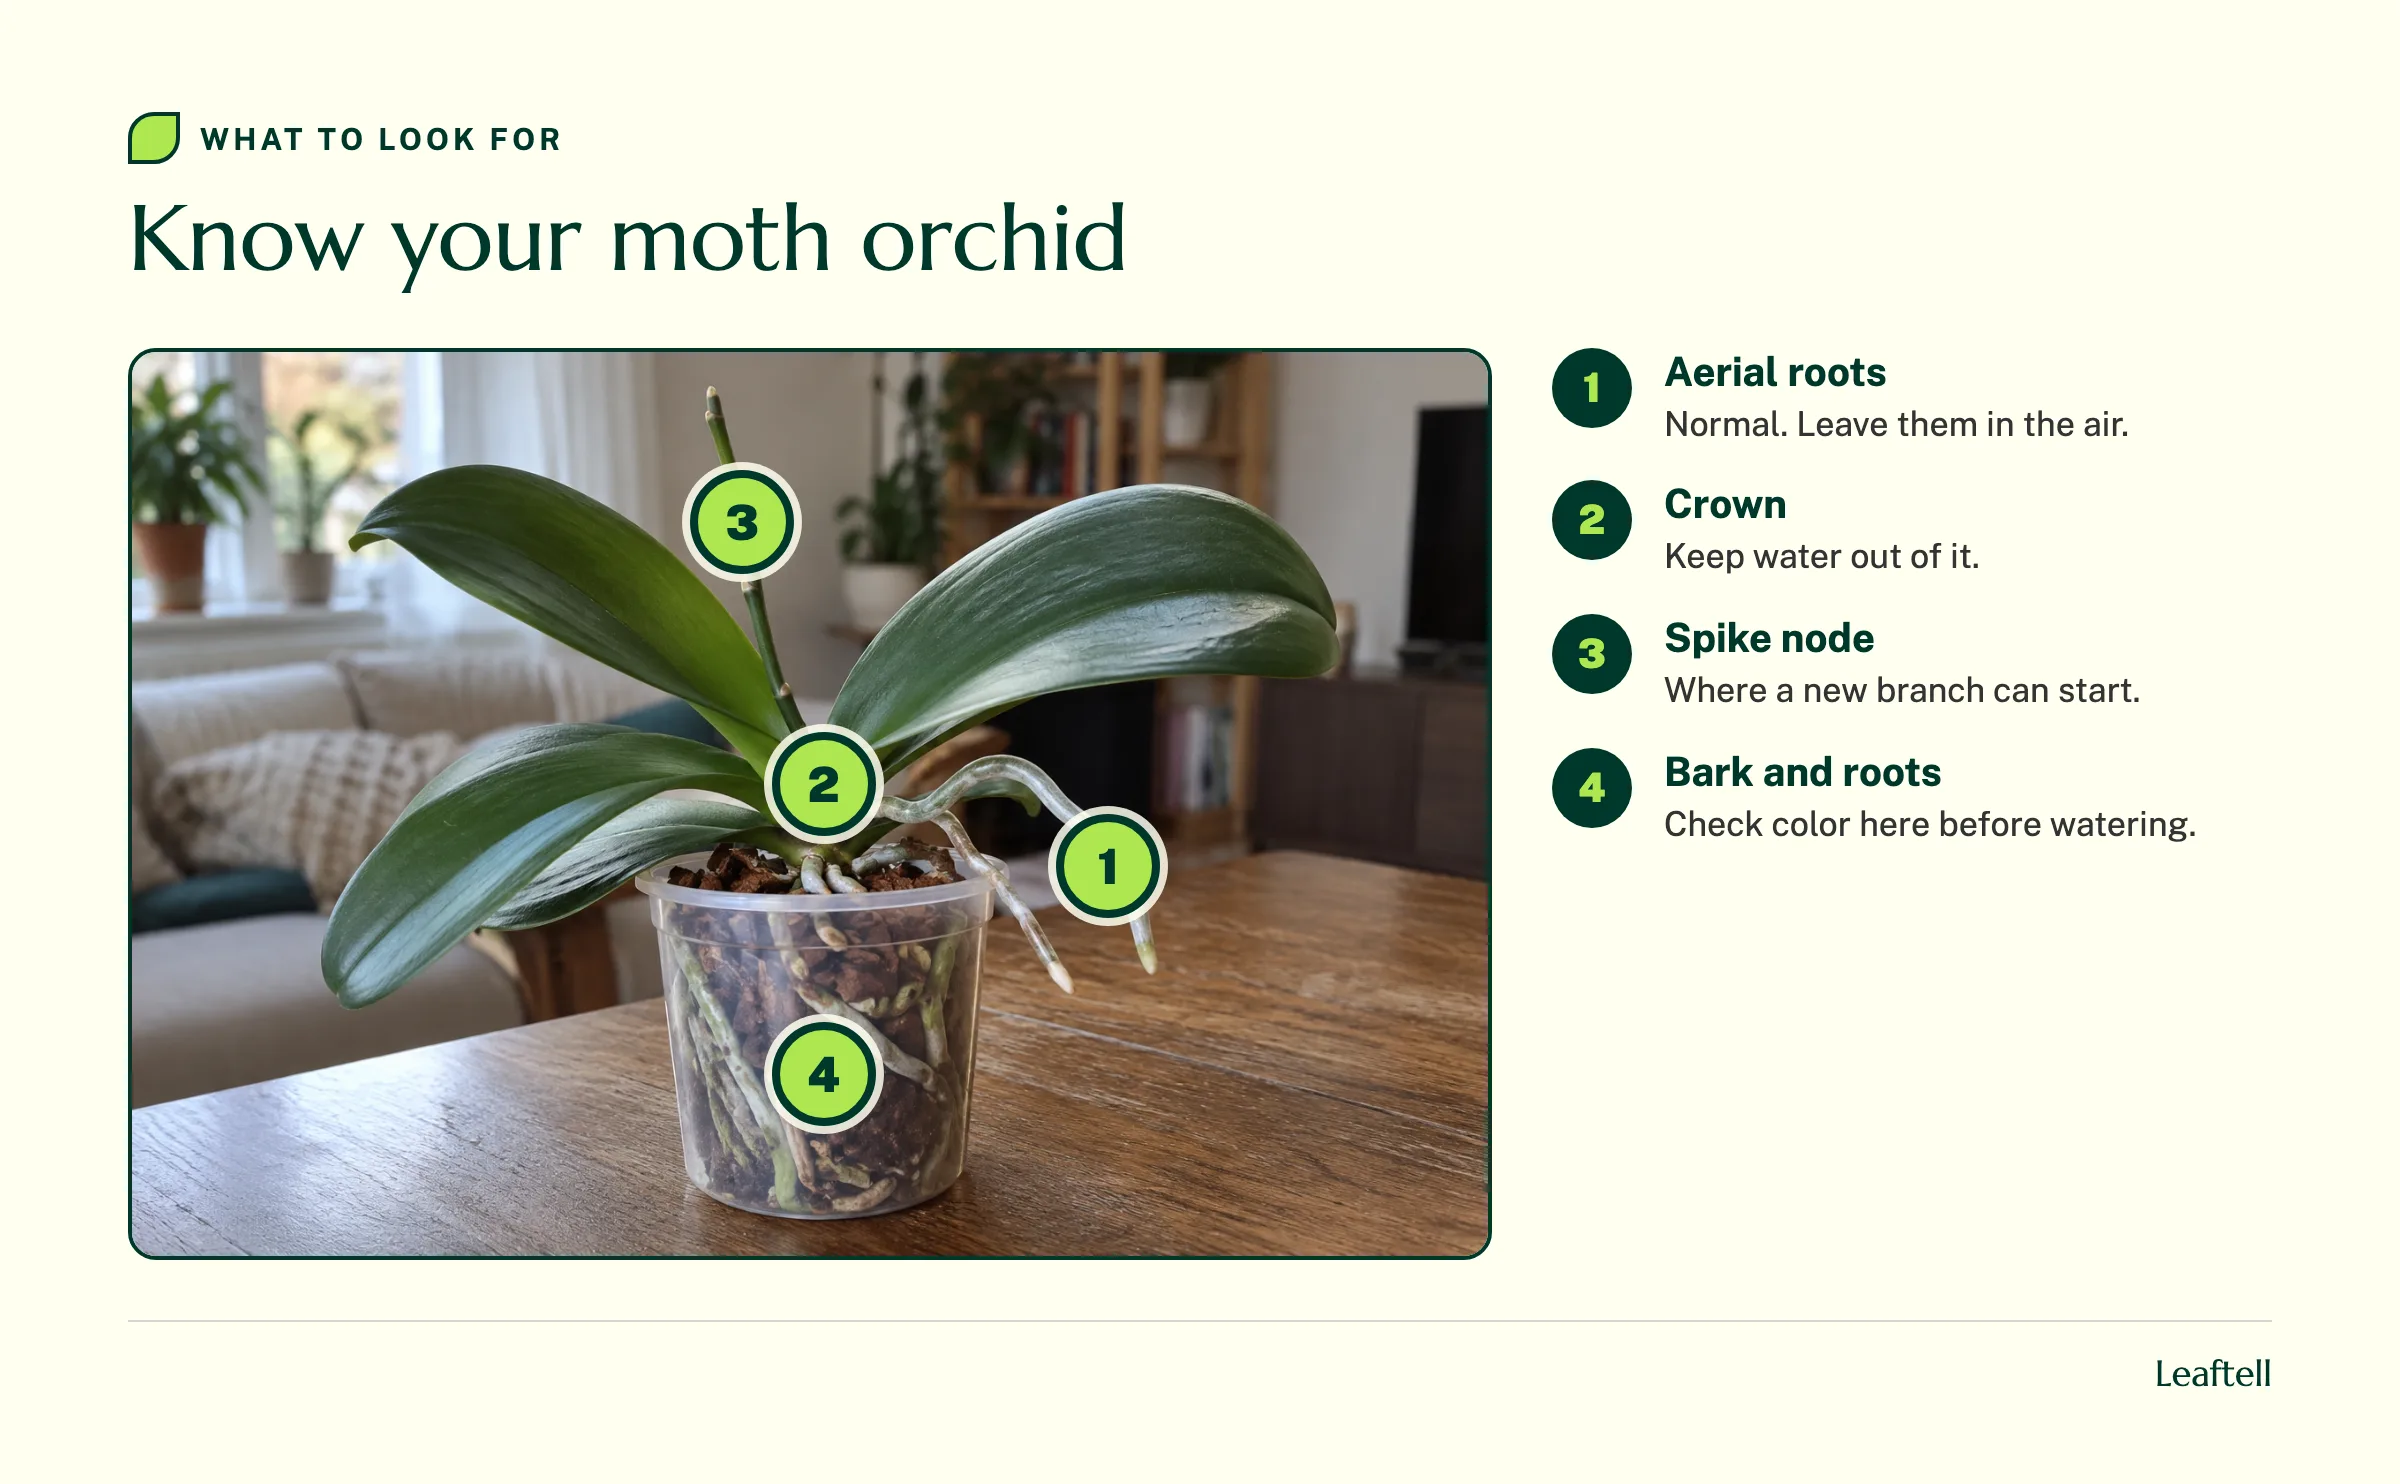
A moth orchid is an epiphyte. In the wild it hangs onto tree bark with its roots in moving air, which is why it is sold in chunky bark, not potting soil. The University of Maryland Extension notes that roots climbing out over the pot are normal, so leave them alone. Learn four parts of the plant: the aerial roots, the crown where the leaves meet, the nodes on the flower spike, and the roots you can see through the pot wall.
| Task | How often | What to check first |
|---|---|---|
| Water | Water as the mix approaches dry; soak and drain | Compare roots, mix moisture and pot weight together |
| Feed | Every third or fourth watering while growing | Plant actively growing or in bloom |
| Rotate and check light | Monthly | Leaf color, light green is the goal |
| Repot | Every 1 to 2 years | Bark breaking down like mulch |
| Trim spent spike | After the last flower drops | Spike green or dry |
Sources: UMD Extension and the RHS moth orchid guide. Treat the timings as check-ins, not rules. The plant decides.
Orchid care indoors: light and temperature
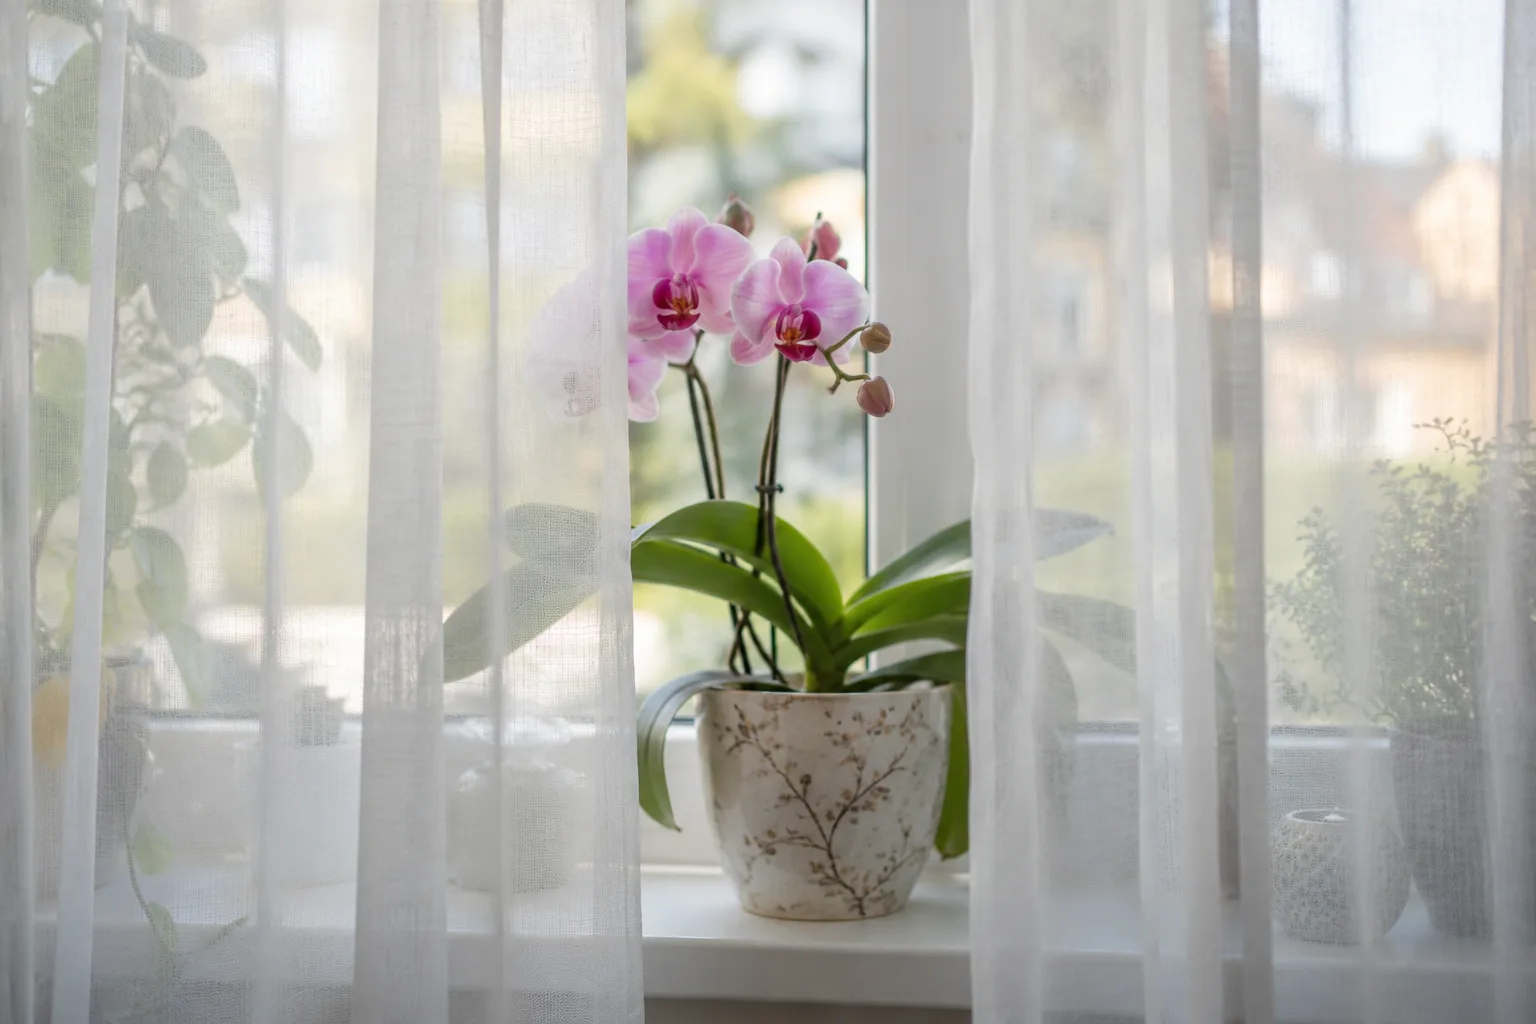
An east window is the easy win. A west window works too if the plant sits back from the glass or behind a sheer curtain in summer. The RHS says to keep moth orchids out of direct summer sun, which can scorch the leaves, and to give them bright light in winter to encourage flowering.
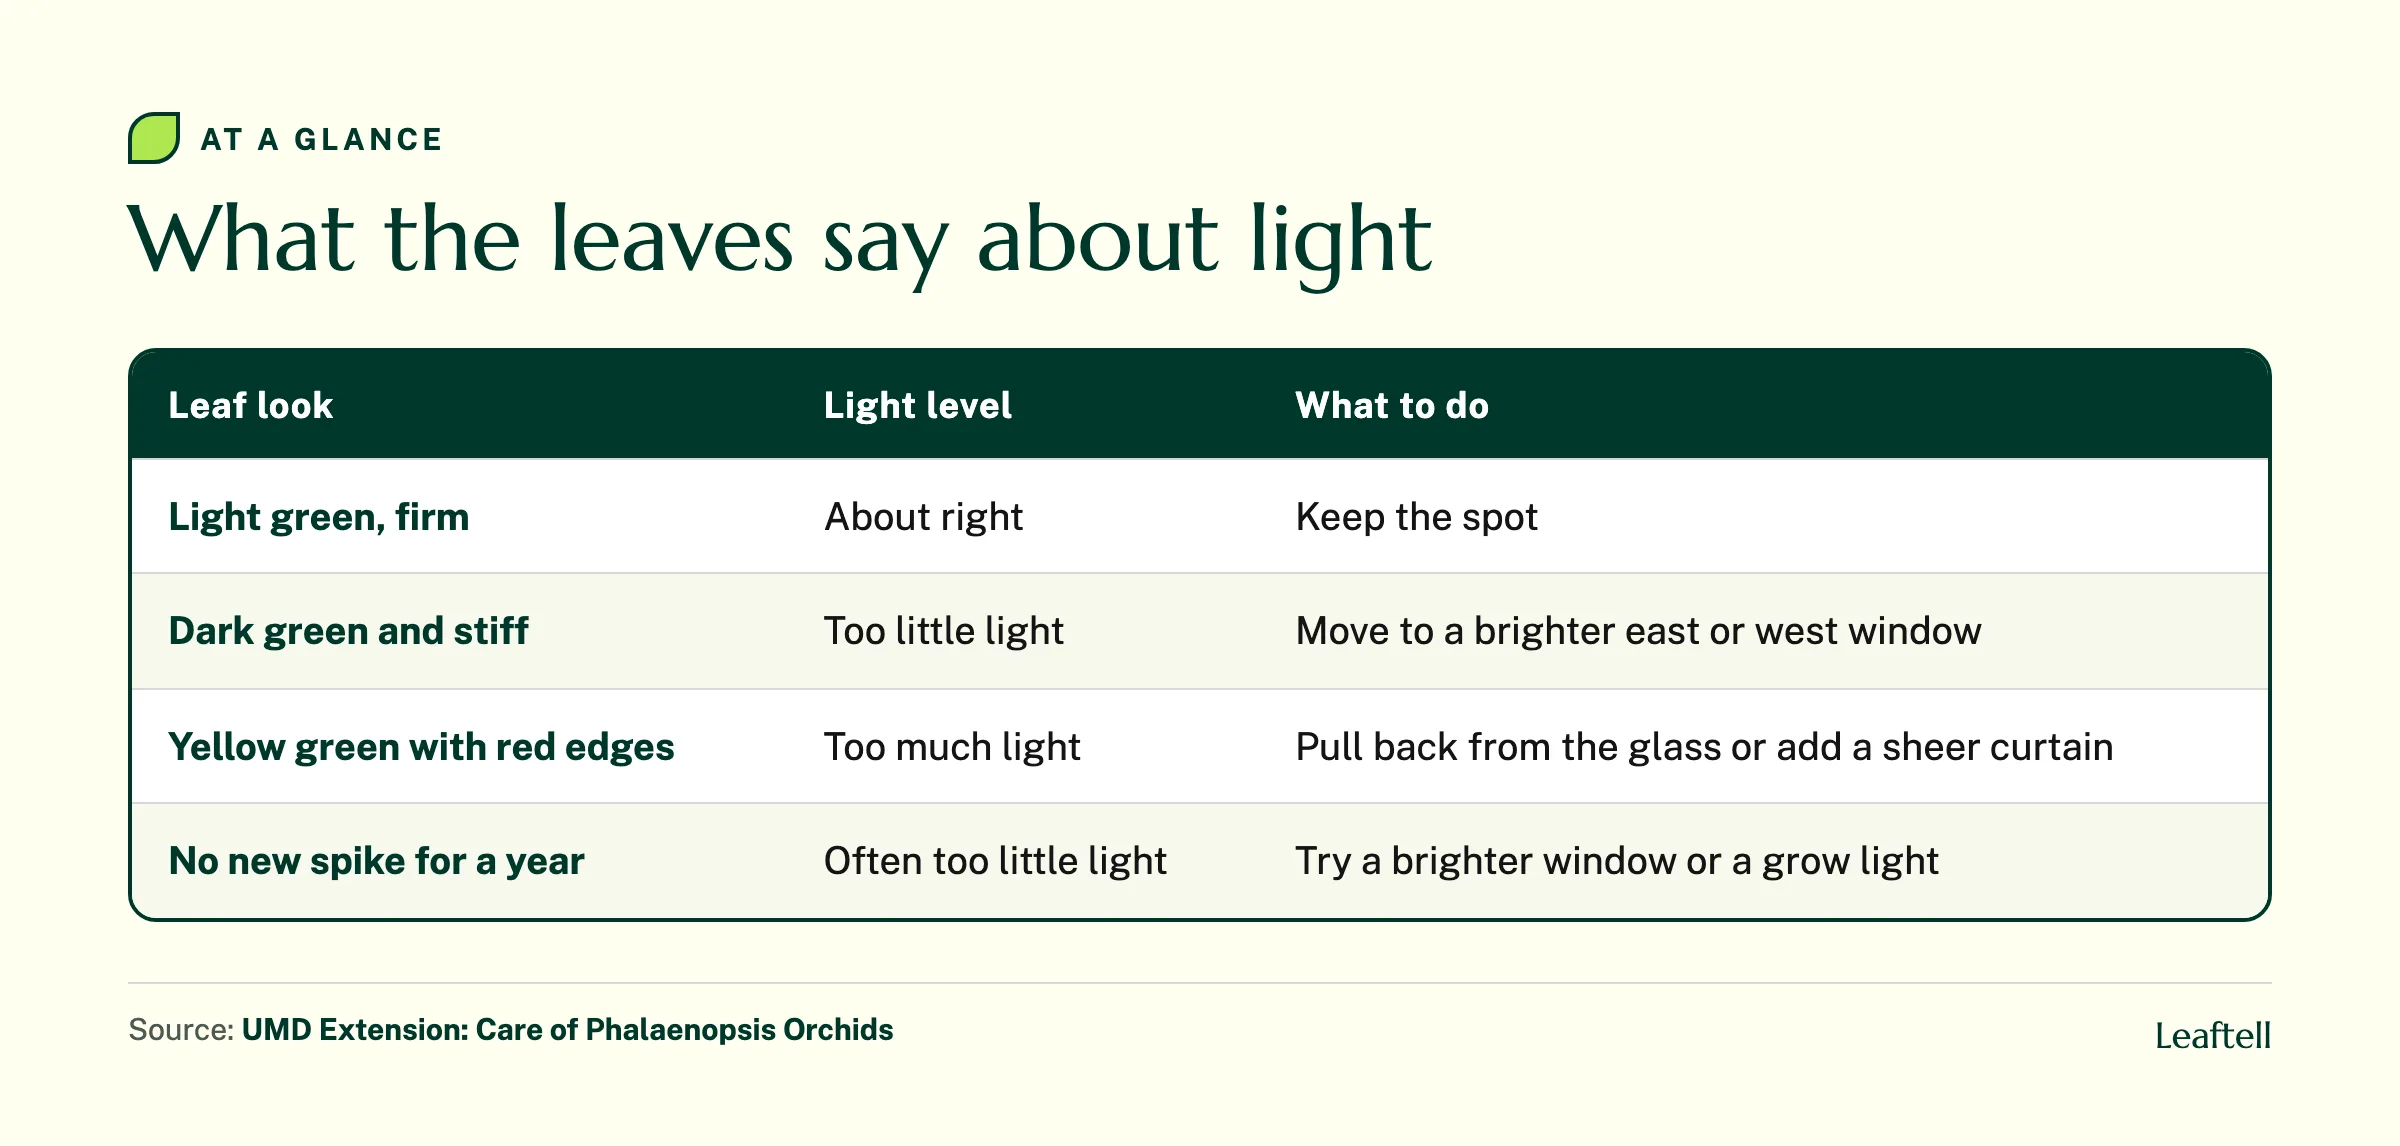
Your orchid's leaves are a light meter. Light green, firm leaves mean the light is about right. Dark green, stiff leaves mean too little light, and that is the most common reason an orchid will not bloom again. Yellow green leaves with reddish edges mean too much. Our guide to reading your plant's light shows how to judge a window without a meter.
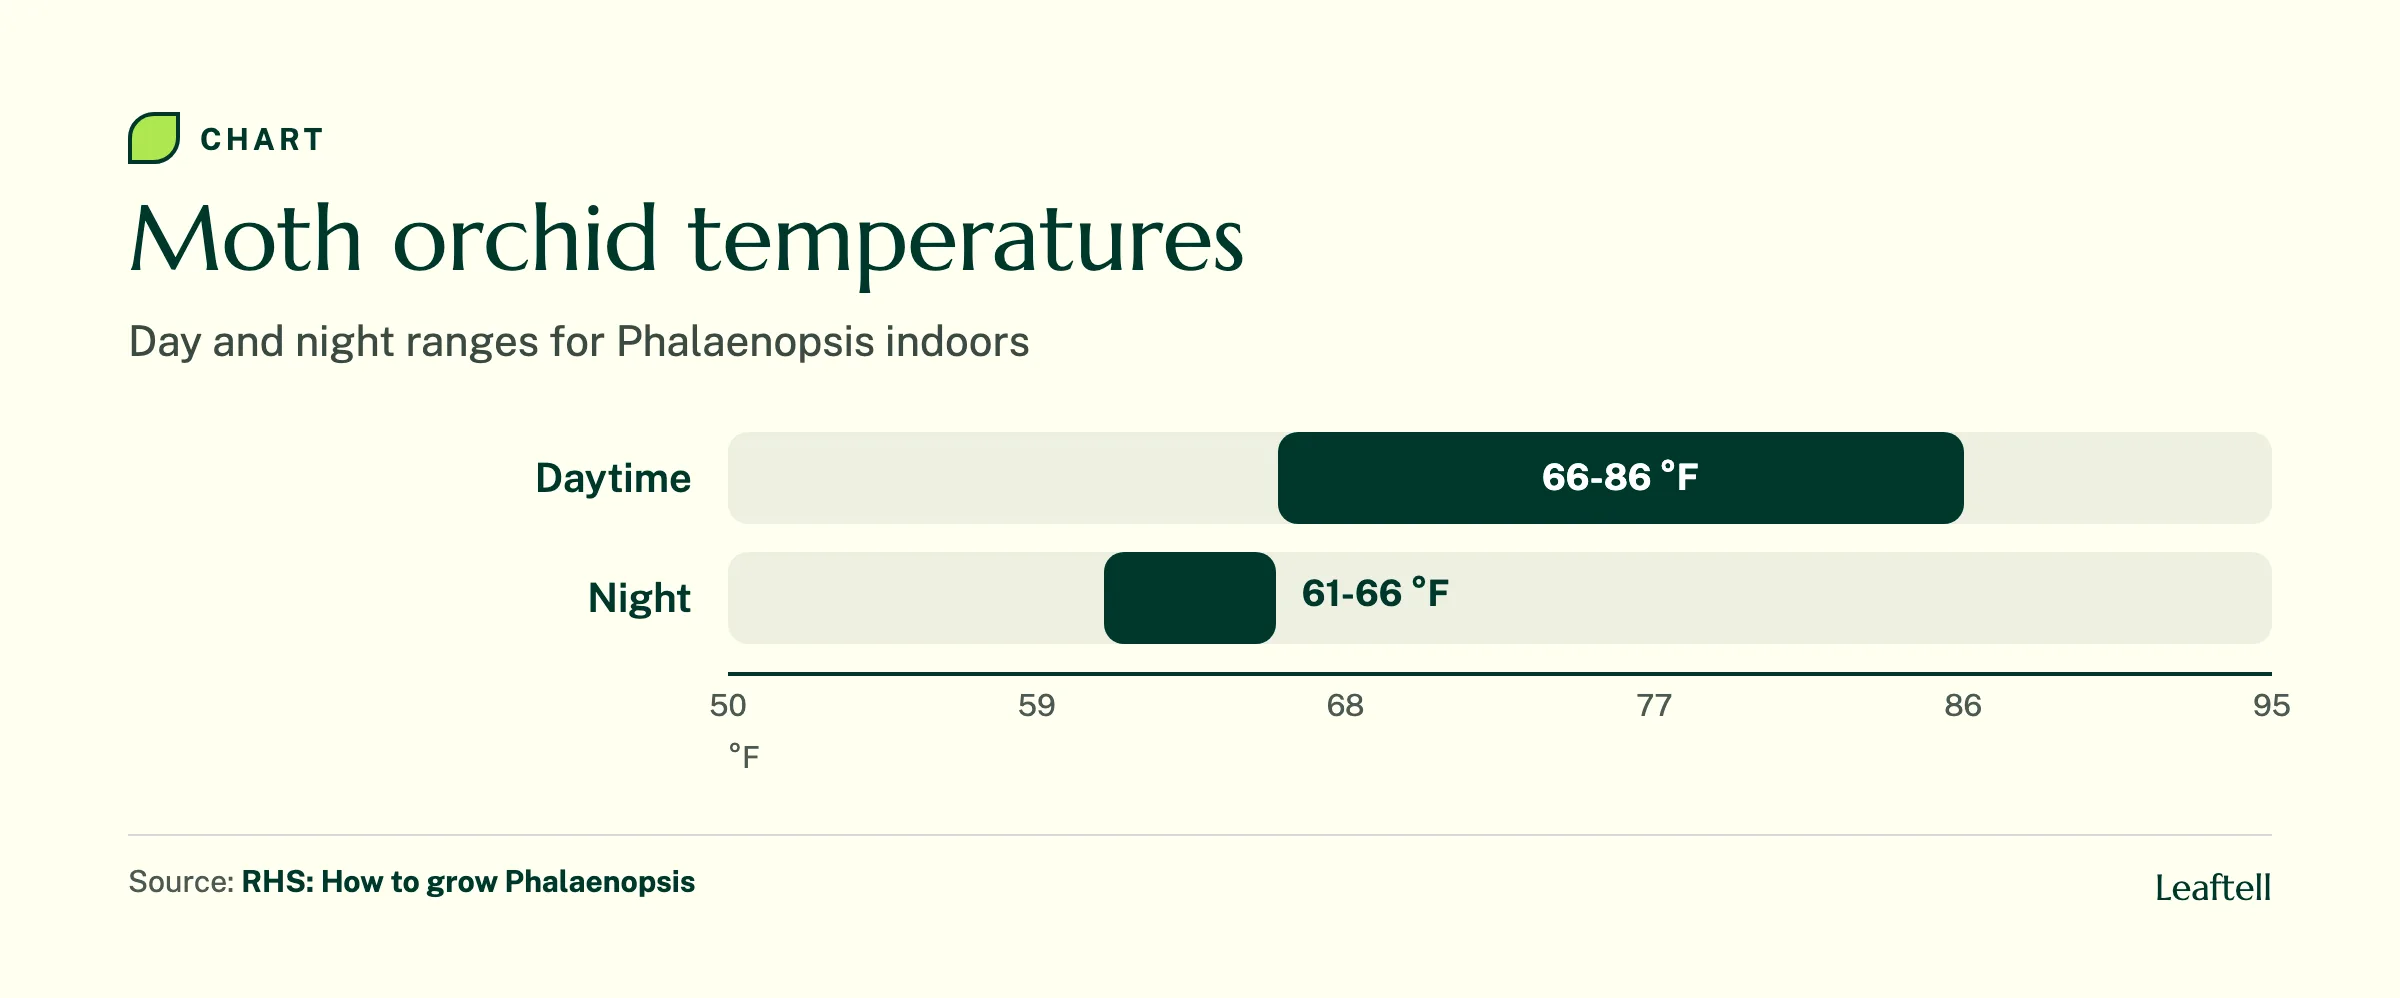
Temperature is simpler. Moth orchids like the same rooms you do. The RHS gives 66 to 86 °F during the day and 61 to 66 °F at night. Keep them away from heaters, air conditioning vents and cold drafty glass in winter.
How often to water orchids
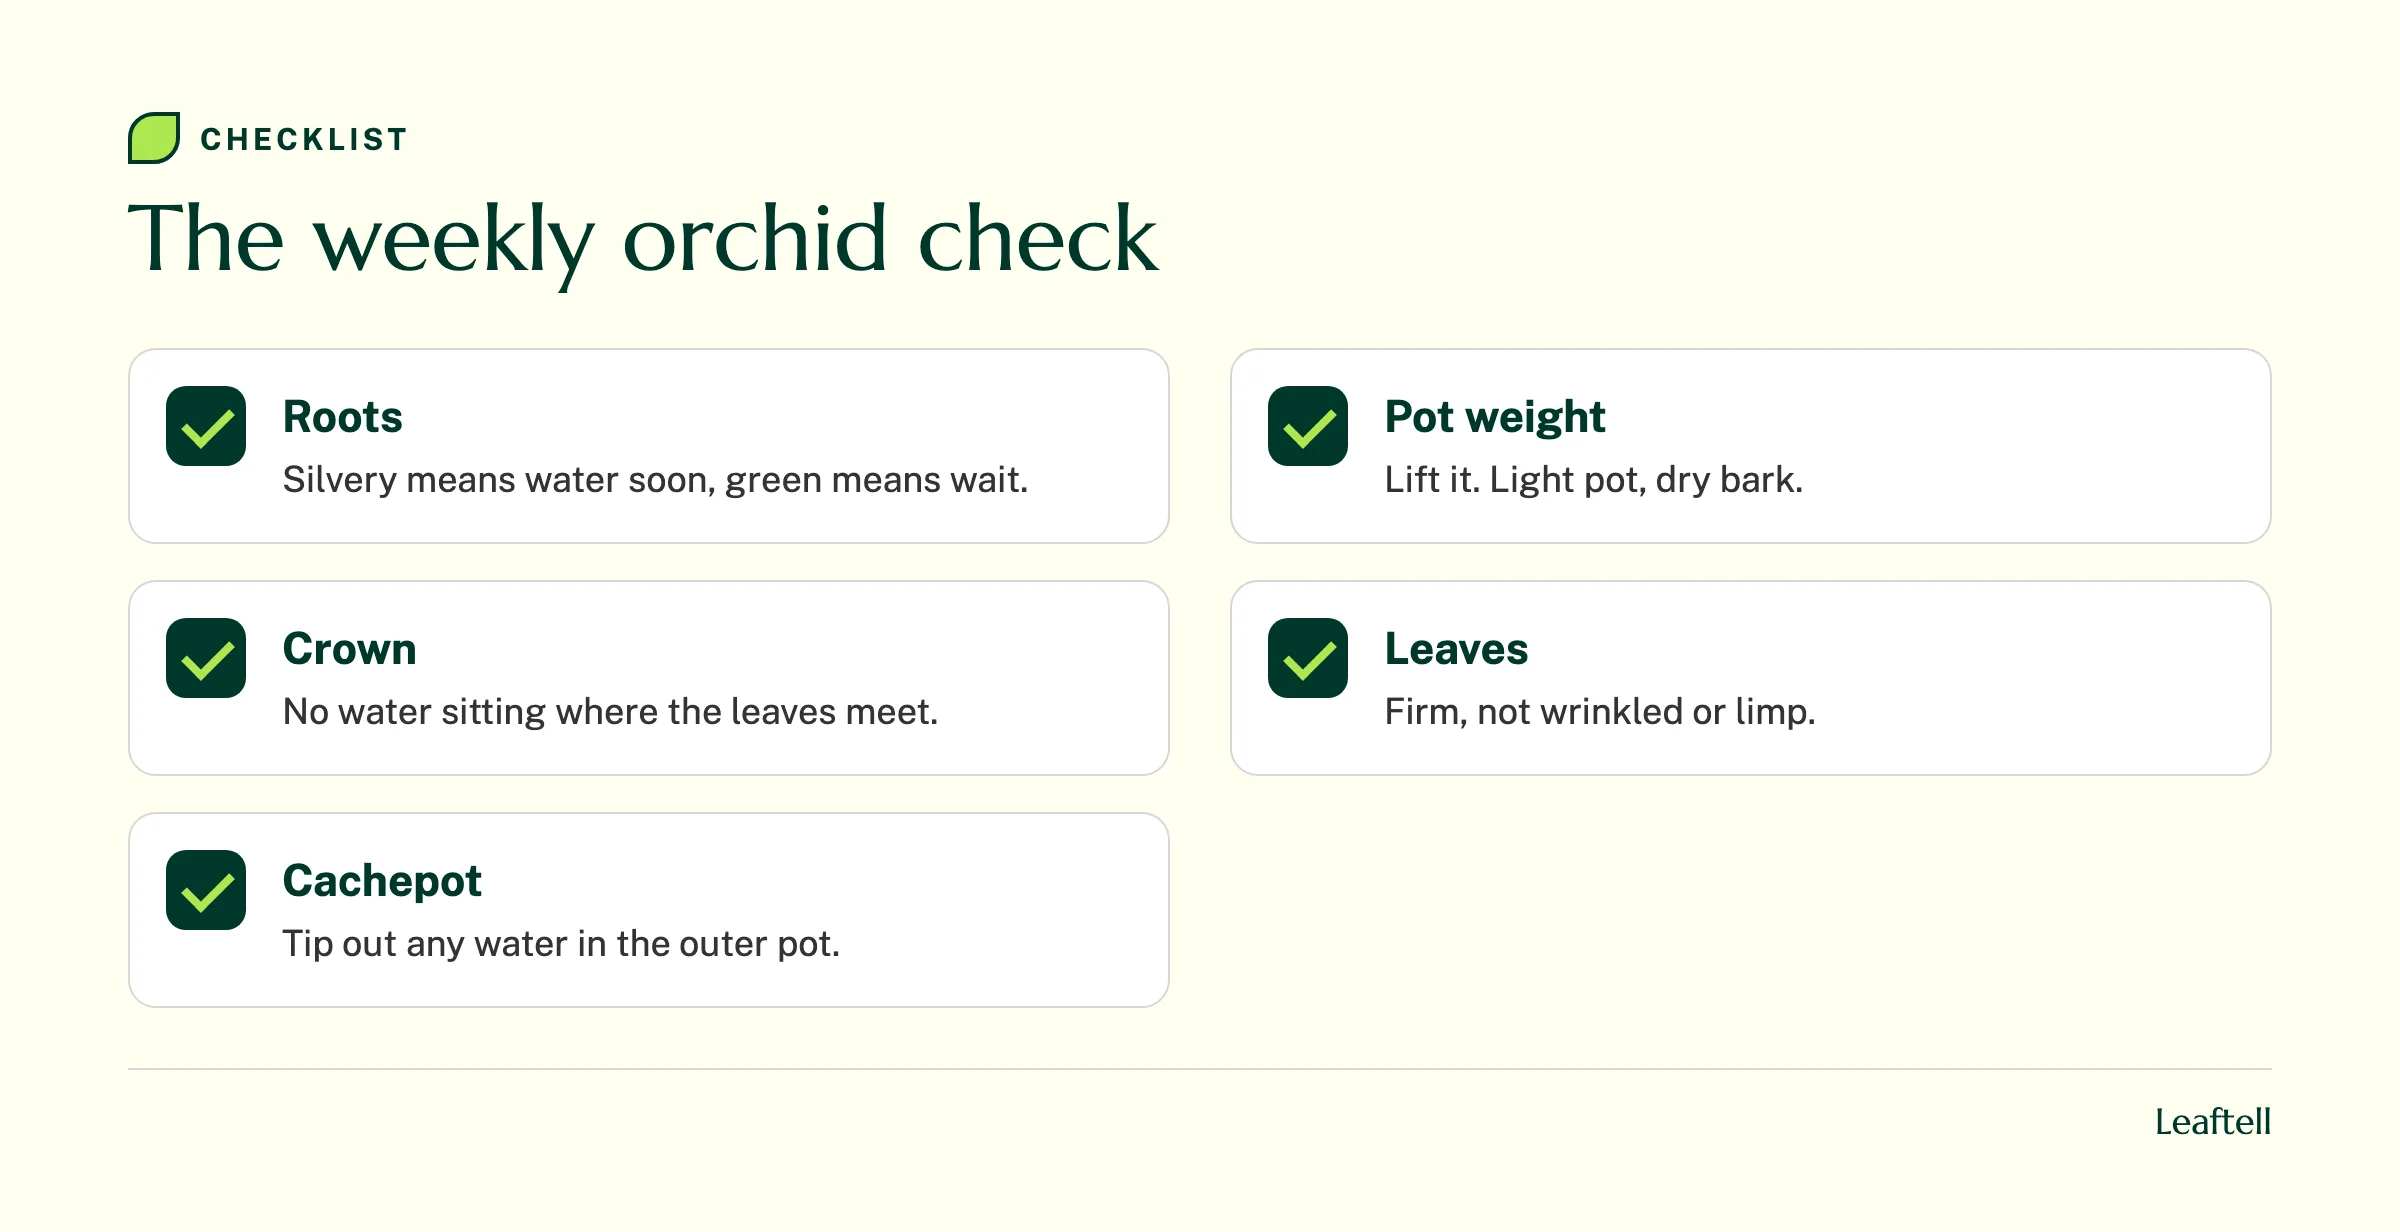
University of Maryland gives roughly weekly watering under normal home conditions as a reference, not a schedule for every pot. Bark size, sphagnum moss, pot ventilation, warmth and light change drying time. Check inside the pot: silvery roots and a lighter pot support watering when the mix is approaching dry. If the medium is still wet, wait even if exposed aerial roots look silver.
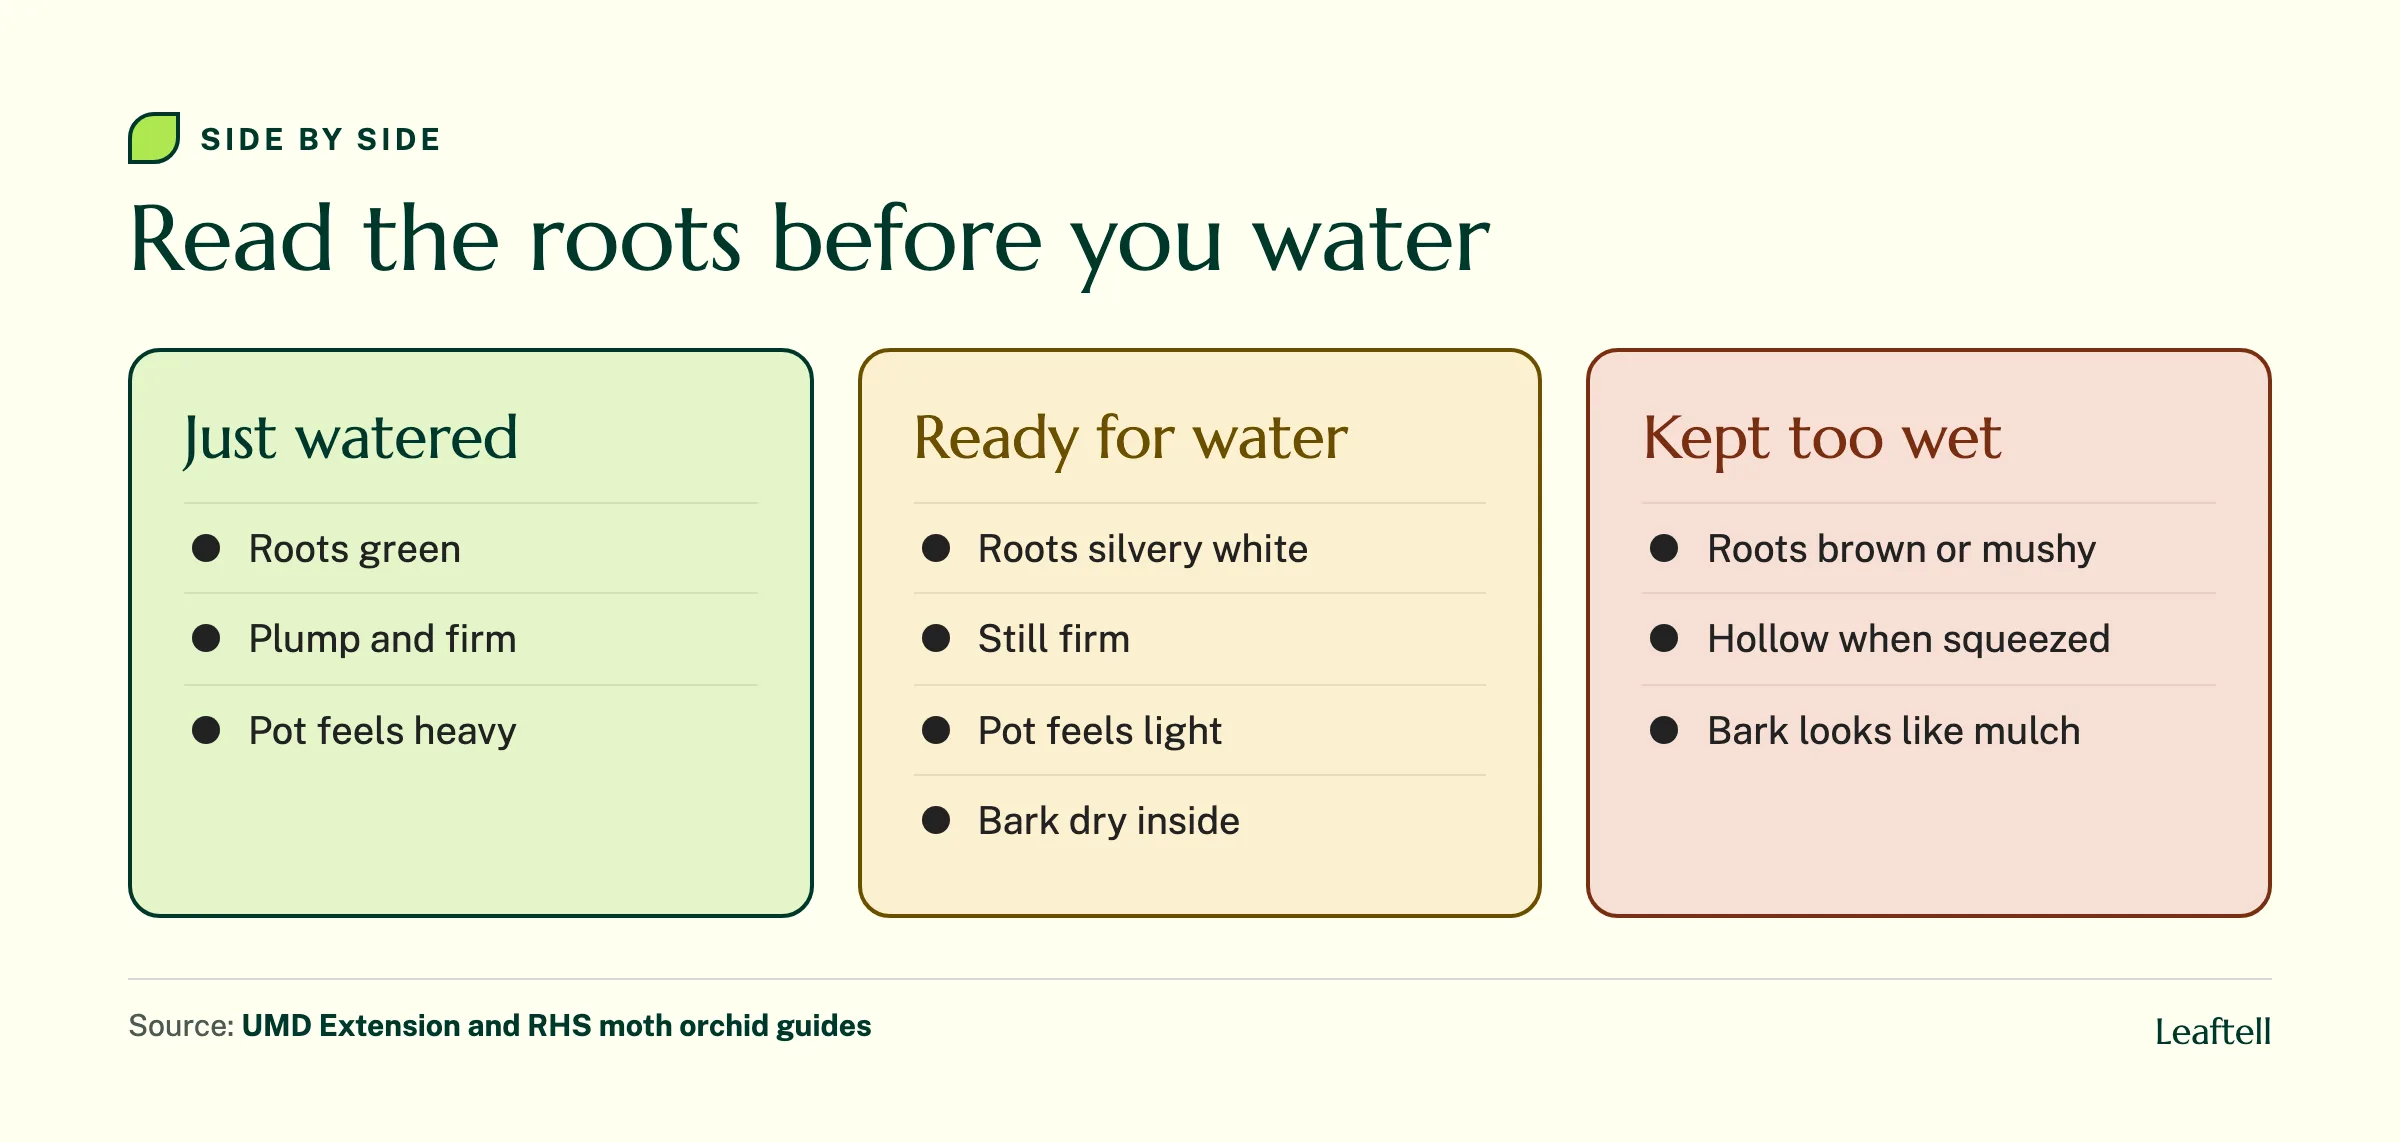
UMD Extension describes the color shift: roots go from dull silver or white to pale green once they have taken up enough water. Look through the pot wall, then lift the pot. A just-watered pot feels noticeably heavier. After two or three weeks you will know the weight of "dry" by hand. If you want a general refresher, our wet or dry soil checks cover the same idea for regular potting mix.
How to water an orchid
- Take it to the sink
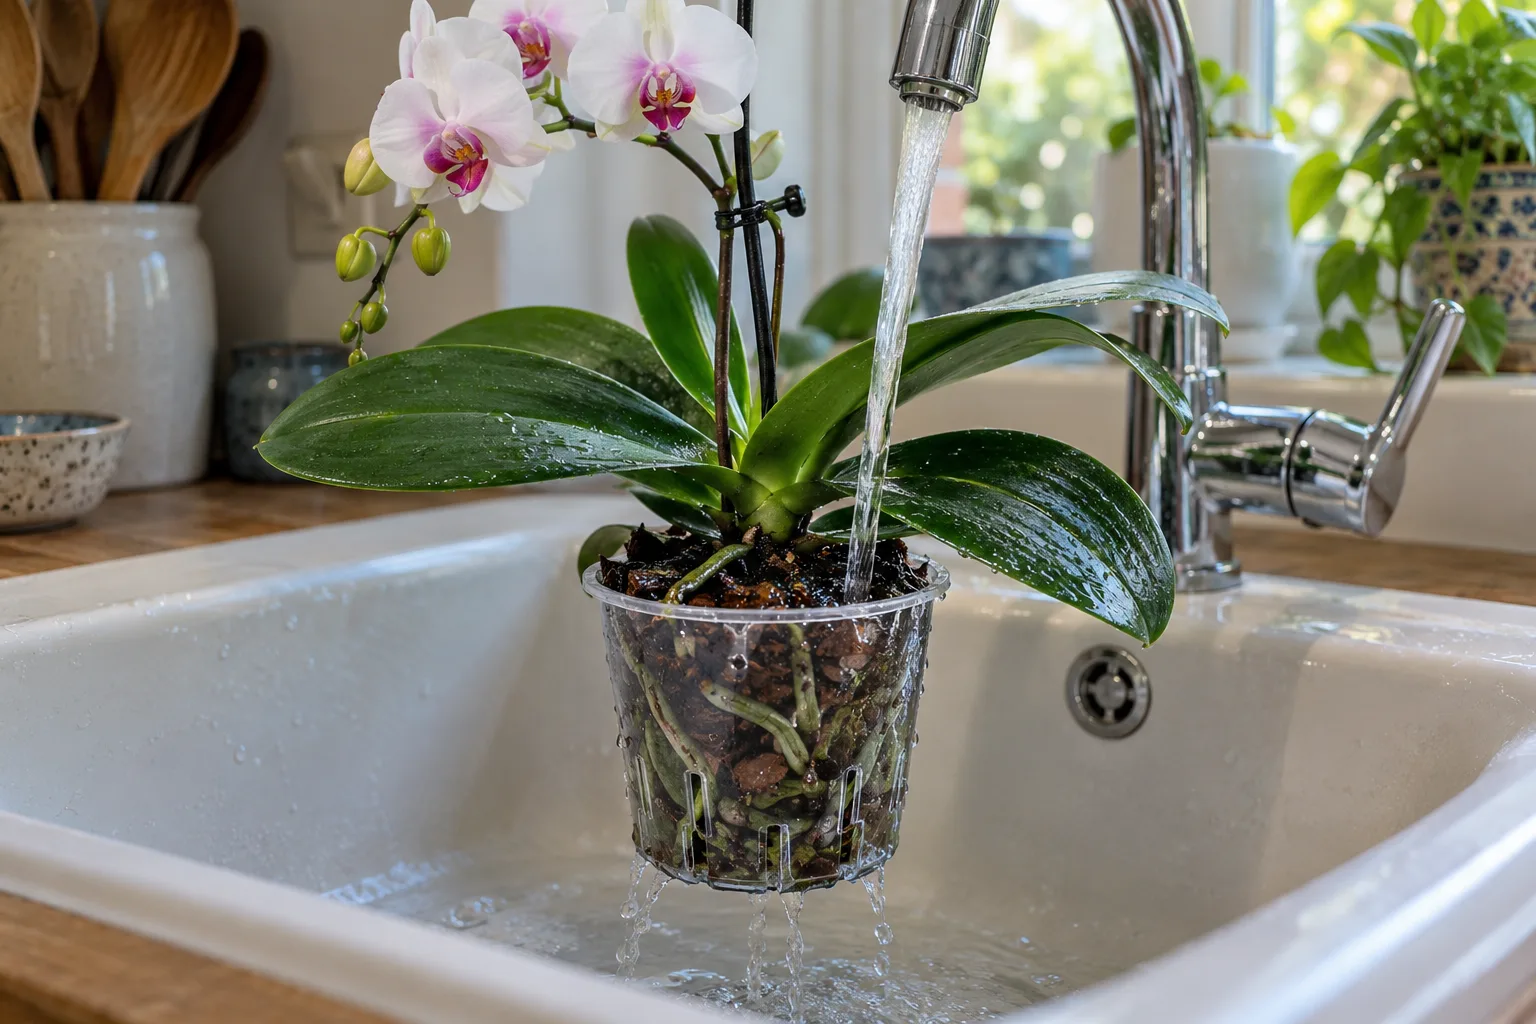
Lift the clear inner pot out of any decorative cachepot and set it in a sink or tub.
- Soak the bark slowly
Run lukewarm water over the bark and roots for about a minute, let it soak in, then repeat 3 or 4 times over about 10 minutes. Bark sheds water at first and absorbs it slowly. Keep water off the leaves where you can.
- Drain completely
Let the pot drain for several minutes until no more water drips from the holes.
- Dry the crown
If water pooled where the leaves meet, blot it with a paper towel. Standing water in the crown can lead to rot.
- Put it back dry
Return it to the cachepot and window. Check the cachepot for water a few hours later and tip out anything that collected.
What about ice cubes? They do deliver a small, slow drink, but they never wet the whole root ball and they chill a tropical plant. Both the RHS (tepid water) and UMD (warm water) recommend the opposite. A real soak and a full drain beats it.
Overwatering shows up as brown, mushy or hollow roots and leaves that go limp even though the bark is wet. If that sounds familiar, read our root rot guide and the overwatered plant signs before you water again. Wrinkled, leathery leaves with dry silvery roots point the other way: the plant is thirsty, often from low humidity and too little water.
Feeding, humidity and the mistakes that kill orchids
Feed lightly. UMD Extension suggests a commercial orchid fertilizer every third or fourth watering while the plant is growing or blooming, and none in winter. The RHS adds that you should water without fertilizer regularly to flush salts out of the bark. Always follow the label rate. More fertilizer gives lush leaves, not more flowers.
Humidity matters less than people think. UMD notes that misting does not add much moisture indoors. A pebble tray helps a little, as long as the pot sits above the water line and the roots never stand in it.
The mistakes that kill most store orchids:
- Leaving water in the cachepot. The decorative outer pot holds the drain water against the roots for days.
- Repotting into potting soil. Soil packs around the roots and suffocates them. Use bark-based orchid mix only.
- Watering on a schedule, not by the roots. A cool, dim winter room can stretch the gap to 10 days or more.
- Cutting off aerial roots. They are alive and working. Leave them.
- Treating pests with a mystery spray. Isolate the plant and identify the pest first.
Mealybugs and scale are the two pests you are most likely to meet on an orchid. Both hide in leaf joints and under leaves and leave sticky residue. Compare our mealybug guide and scale insect guide before picking a treatment. Start with the least toxic step, like wiping them off and rinsing the leaves. If you need a product, pick one labeled for indoor plants and that pest, follow the label exactly, and never mix products.
Good news for pet owners: the ASPCA lists the moth orchid as non-toxic to cats and dogs. Fertilizer and pest products are a different story, so store them out of reach of pets and children.
How to care for an orchid after it blooms
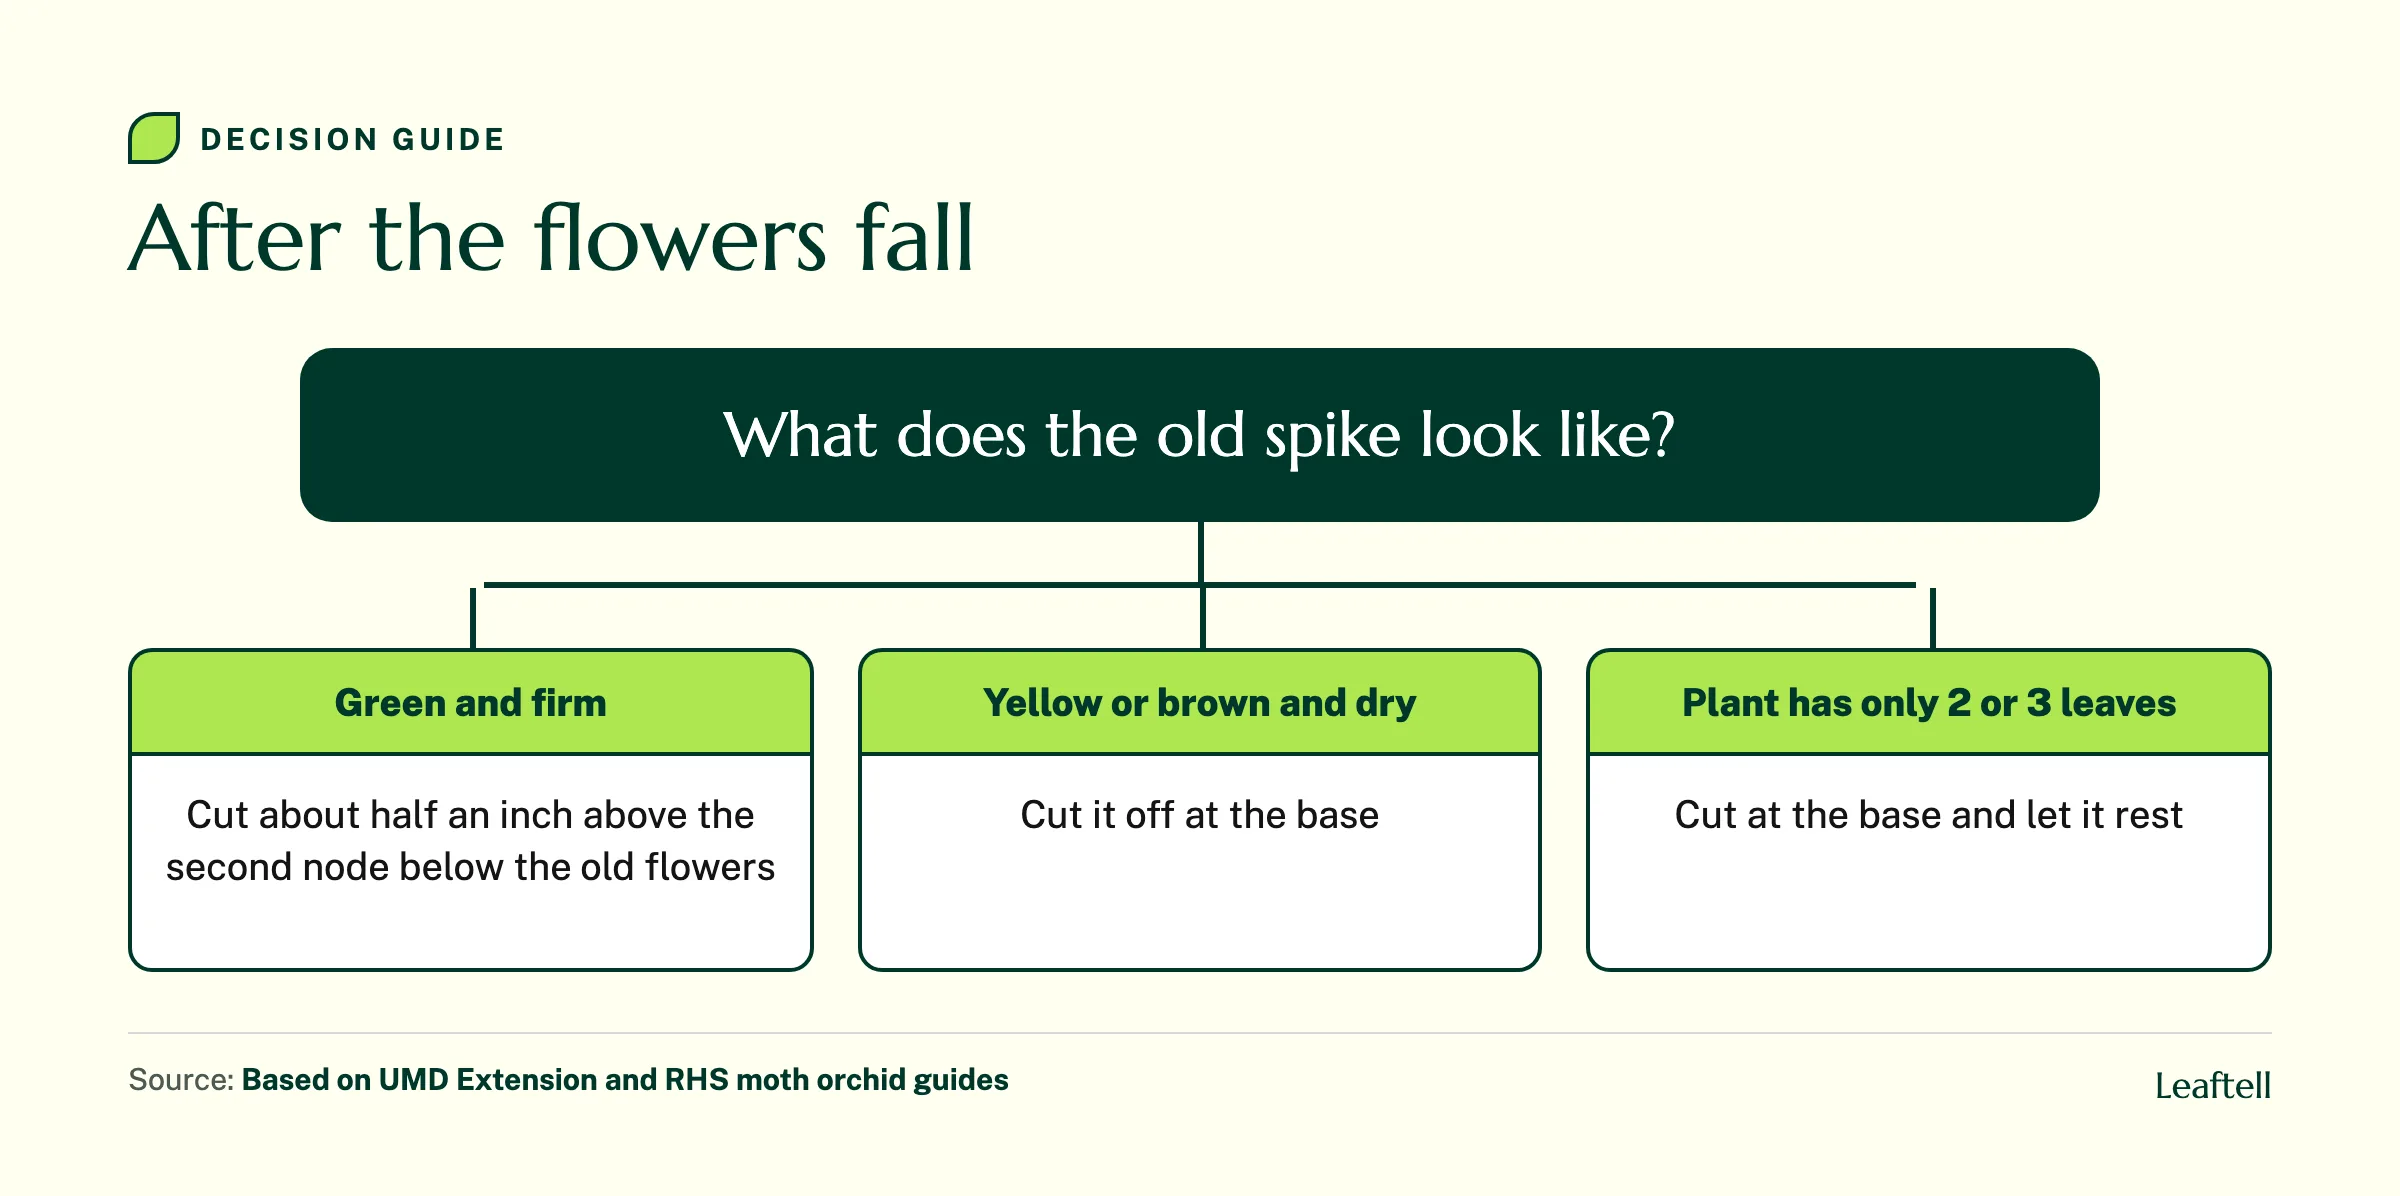
The flowers can last a month or longer. When the last one drops, look at the spike. If it is still green and firm, you can cut it about half an inch above the second node below where the flowers were, and a new side branch may bloom from that node. If the spike is yellow or brown and dry, cut it off at the base.
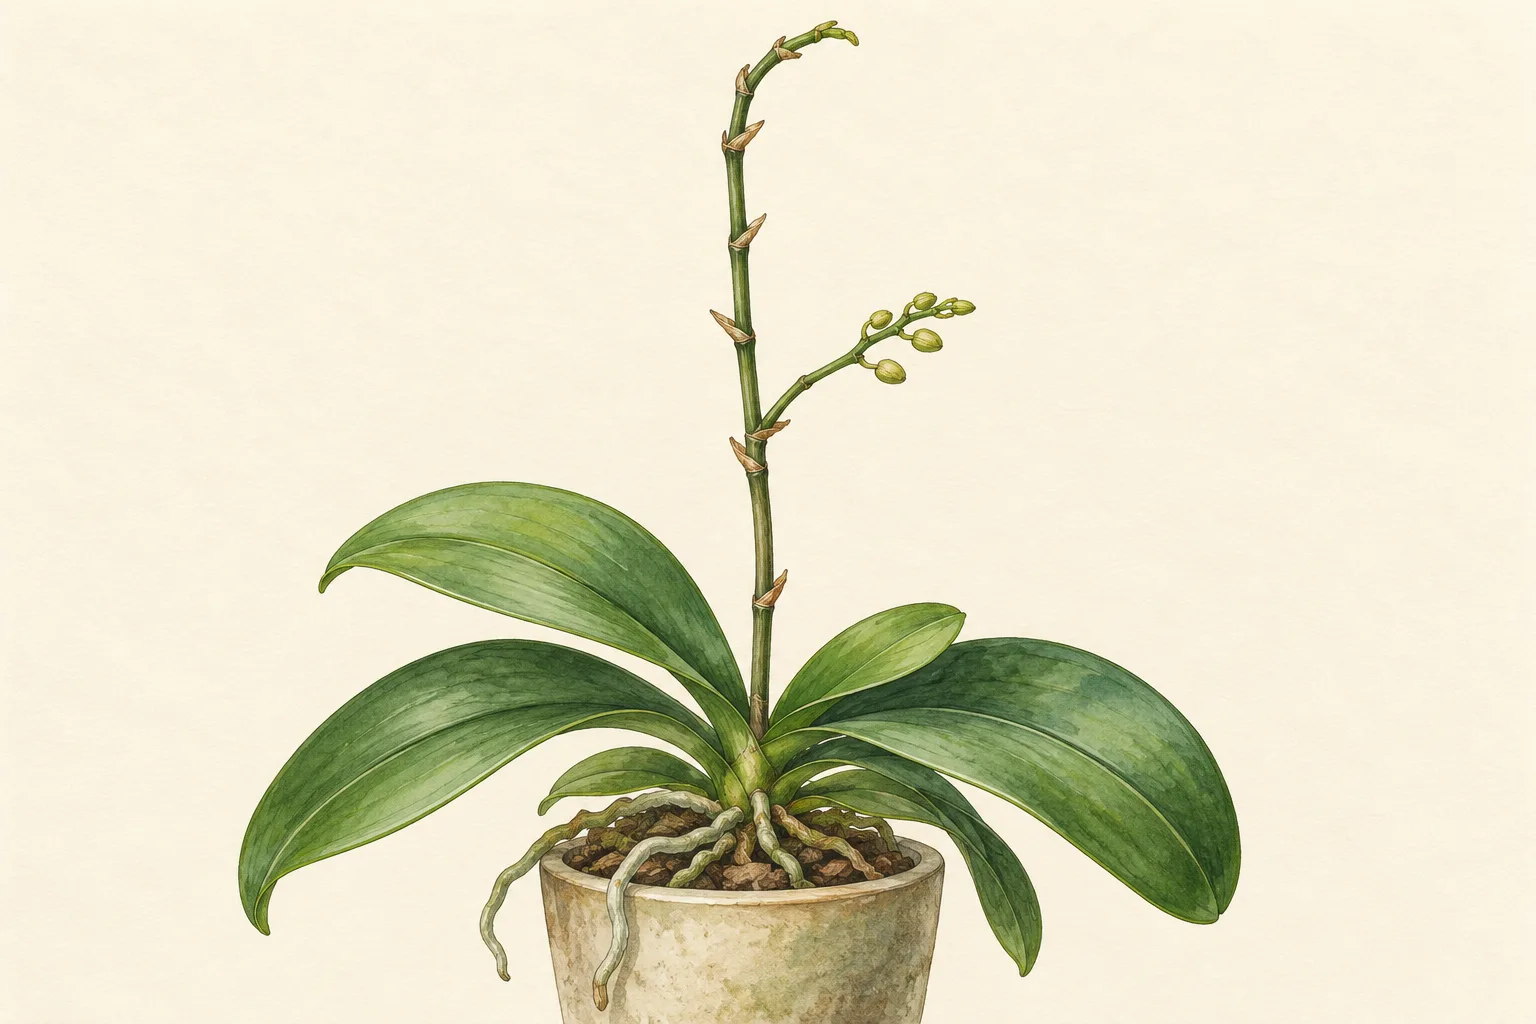
A weak plant with only two or three leaves is better off putting its energy into new leaves and roots, so many growers cut the spike at the base and let it rest. A healthy plant that has not bloomed for a while often just needs more light. The RHS also suggests a cooler spot, about 8 °F cooler, for a month or so to trigger a new spike. Fall nights near a window often do this for you.
When to repot an orchid
Repot every one to two years, or sooner when the bark has broken down and looks like mulch, drains poorly and stays wet. Both UMD and the RHS stress that degraded bark, not the pot size, is what usually causes root rot. The best time is when you see new roots or leaves starting, not necessarily right after flowering.
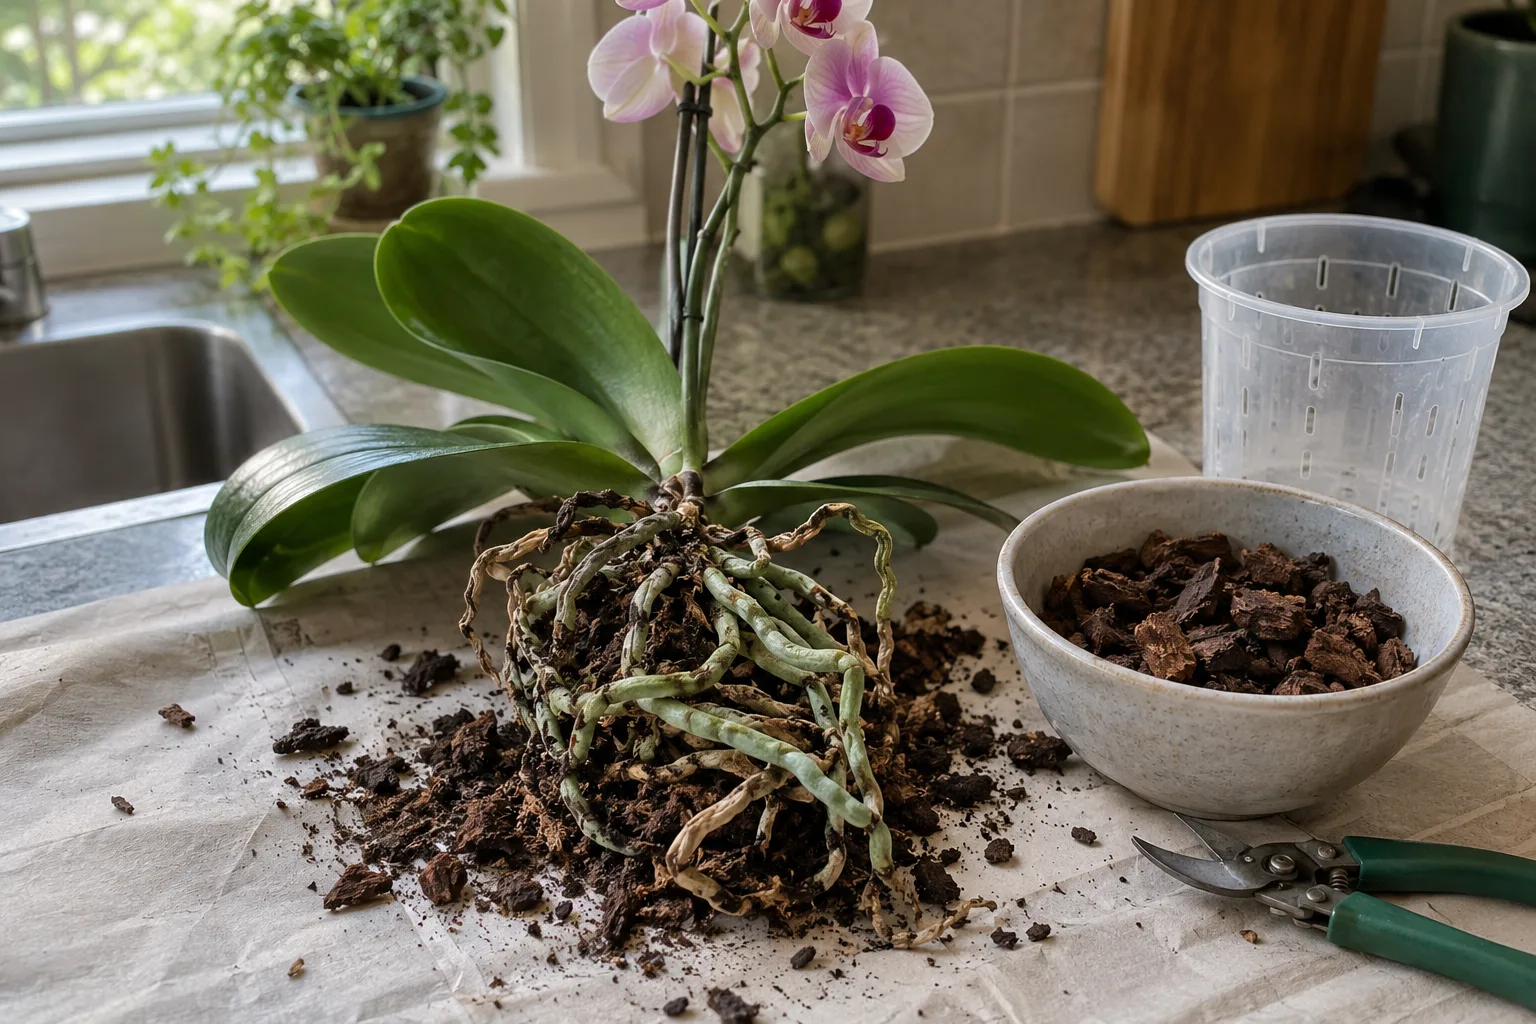
Take the plant out, shake off all the old bark, and snip off roots that are brown, shriveled, mushy or hollow. Keep the plump, firm ones. Moth orchids like a snug pot: if the healthy roots fit back into the same size pot, reuse it. Too big a pot holds extra mix that stays wet. A clear plastic pot with good drainage lets you keep reading the roots. Fill in around the roots with fresh orchid bark, and do not bury the aerial roots.
If leaves start yellowing after repotting, one old bottom leaf fading is often normal aging. Several leaves or the newest center leaf changing is worth a closer look, and our yellow leaves guide walks through the checks.
The short version of orchid care
Bright east light, a soak when the roots go silvery, a full drain, light feeding, and fresh bark every year or two. If you only change one habit, stop watering by the calendar and start watering by the roots. Check again in 7 days, look through the pot, and let the orchid tell you.
Not sure whether a limp leaf or a brown root is a watering problem or something else? Check your orchid in Leaftell and answer a few questions about the roots, light and watering.
Check your growing conditions with the plant watering calculator.
Frequently asked questions
Give it bright, indirect light from an east or west window, water when the roots turn silvery and the pot feels light, and let it drain fully. Feed lightly while it grows, keep it at normal room temperature, and repot into fresh orchid bark every one to two years.
Check the medium, roots and pot weight together, then water as the mix approaches dry. A roughly weekly interval is only a reference for ordinary home conditions; moss, bark, temperature, light and ventilation change it. Silver aerial roots alone do not mean the mix needs water.
Do not let it stand in water in a cachepot, plant it in regular potting soil, leave water sitting in the crown, or cut off its aerial roots. Avoid watering on a fixed schedule without checking the roots first.
If the spike is green, cut it about half an inch above the second node below the old flowers for a chance at a side branch. If it is brown, cut it at the base. Then keep watering by the roots and give it bright light so it can bloom again.
Only when the crown has rotted or there are no firm roots left at all. An orchid with no flowers, or even a few healthy roots and two leaves, can usually recover with fresh bark and careful watering.
Wrinkled or limp leaves, roots that are brown and mushy or dry and shriveled, buds dropping before they open, and leaves that turn dark green or yellow with red edges from wrong light. Check the roots first, since most stress starts there.
Small, snug pots. A pot that just fits the healthy roots dries out evenly. A big pot holds extra bark that stays wet and can rot the roots.
Soaking the pot in a bowl of water and then draining it fully works well, and the RHS lists it as an option. The key is the full drain afterward. Never leave the pot sitting in water.
Share article
About the author

Keep checking your plant
Plant care reference
Indoor plant care
Build a routine around your plant, light and potting mix.
Plant care reference
Why is my plant dying
Trace leaf and root symptoms before choosing a care change.
Plant care reference
Pothos plant care
Choose a growing spot and prune a trailing pothos for fuller growth.
Plant care reference
How to fix root rot
Inspect root firmness and drainage, then decide whether to repot.