Mealybugs on Plants: Find the Hidden Colony, Not the Fluff
Filip Leszczyński 16 October 2026 11 min read
In this article
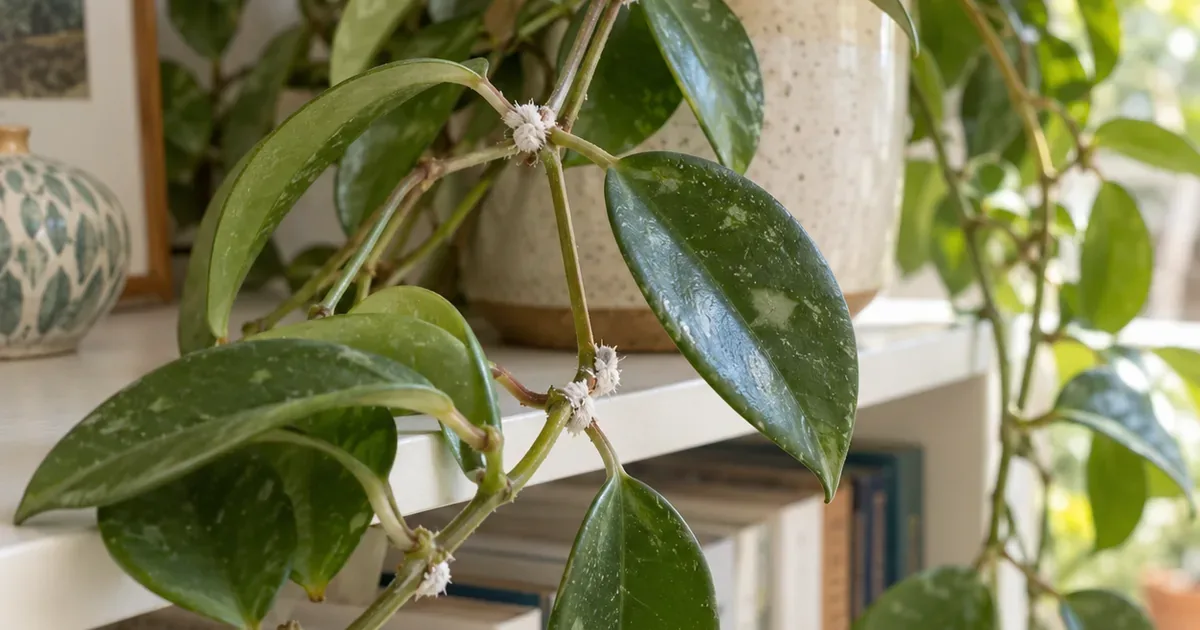
Mealybugs on plants look like small white cottony tufts tucked into leaf joints, stems and other sheltered spots. Confirm there is an actual insect under the fluff, isolate the plant, and lift off what you can reach with a damp swab.
Then plan to look again, because the tufts you can see are rarely the whole colony. Mealybugs hide where leaves overlap, under loose sheaths, around supports, at the pot rim and sometimes on the roots. Wiping the obvious white patches makes the plant look clean while much of the colony carries on.
Below: how to tell mealybugs from other white stuff, where to search, how to remove them without scarring the plant, when a labeled product makes sense, and a 14-day map of every spot you checked.
White bugs on plants: mealybugs or something else?
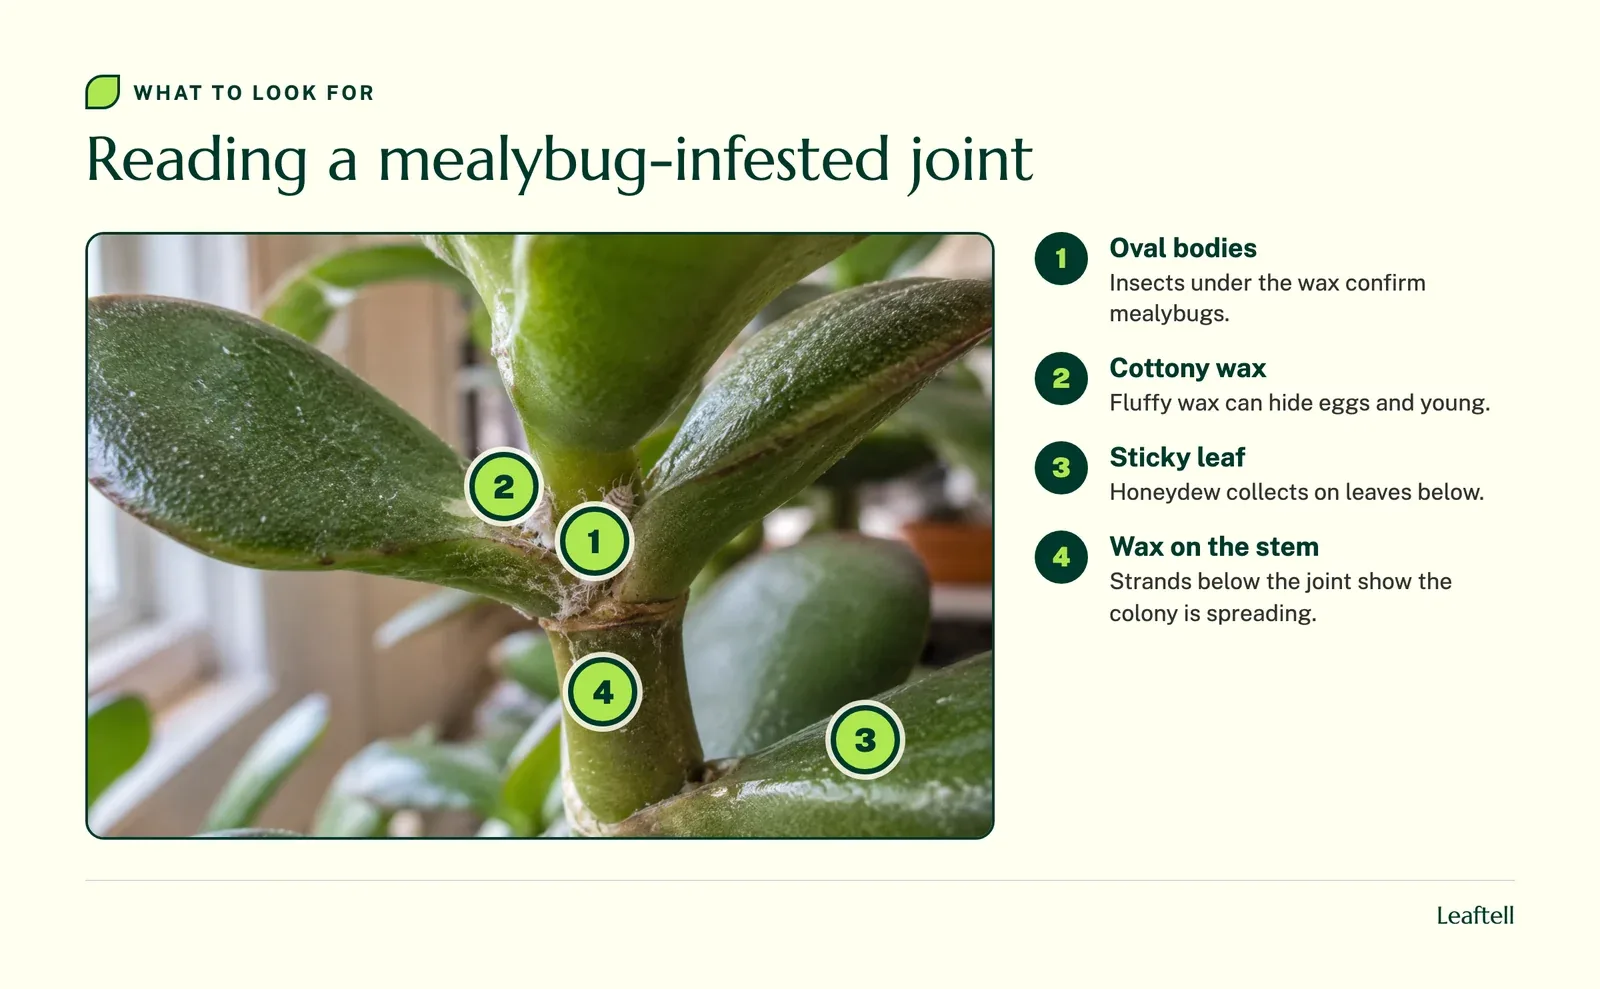
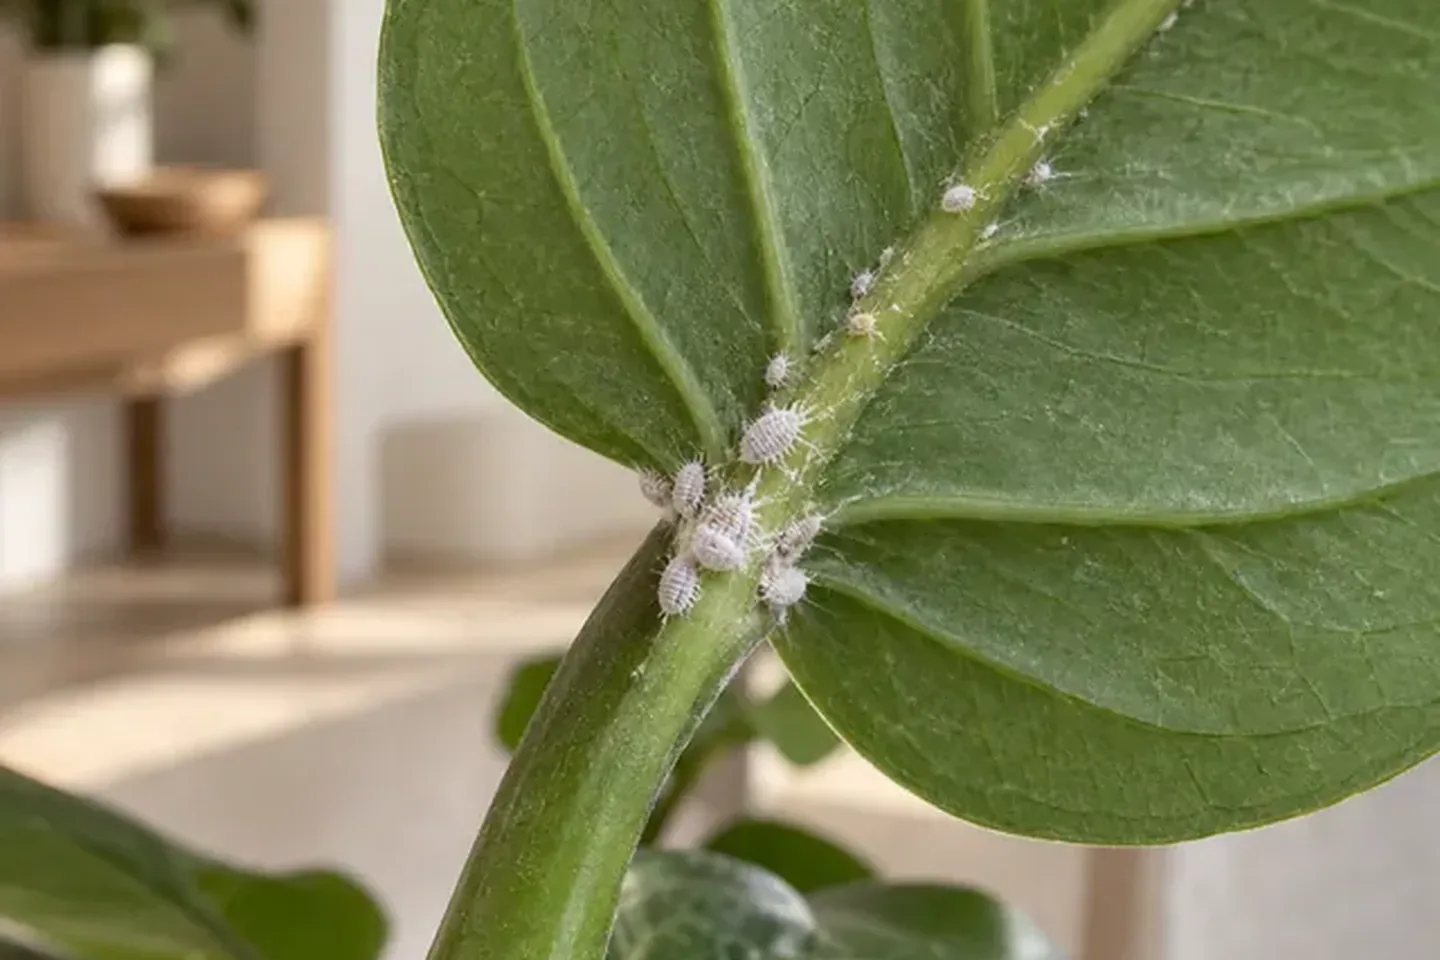
White bugs on plants are often mealybugs when you find small oval bodies under a waxy, cottony coating, clustered in leaf joints and along stems. Dust, mineral crust, fungal growth and bits of potting mix can all look pale too, so magnify the white material and look for a body before you treat.
UC IPM describes the cottony colonies and the honeydew that go with mealybugs. A sticky shine on leaves below a white tuft is a supporting clue, and this guide to sticky leaves explains why sap feeders leave it.
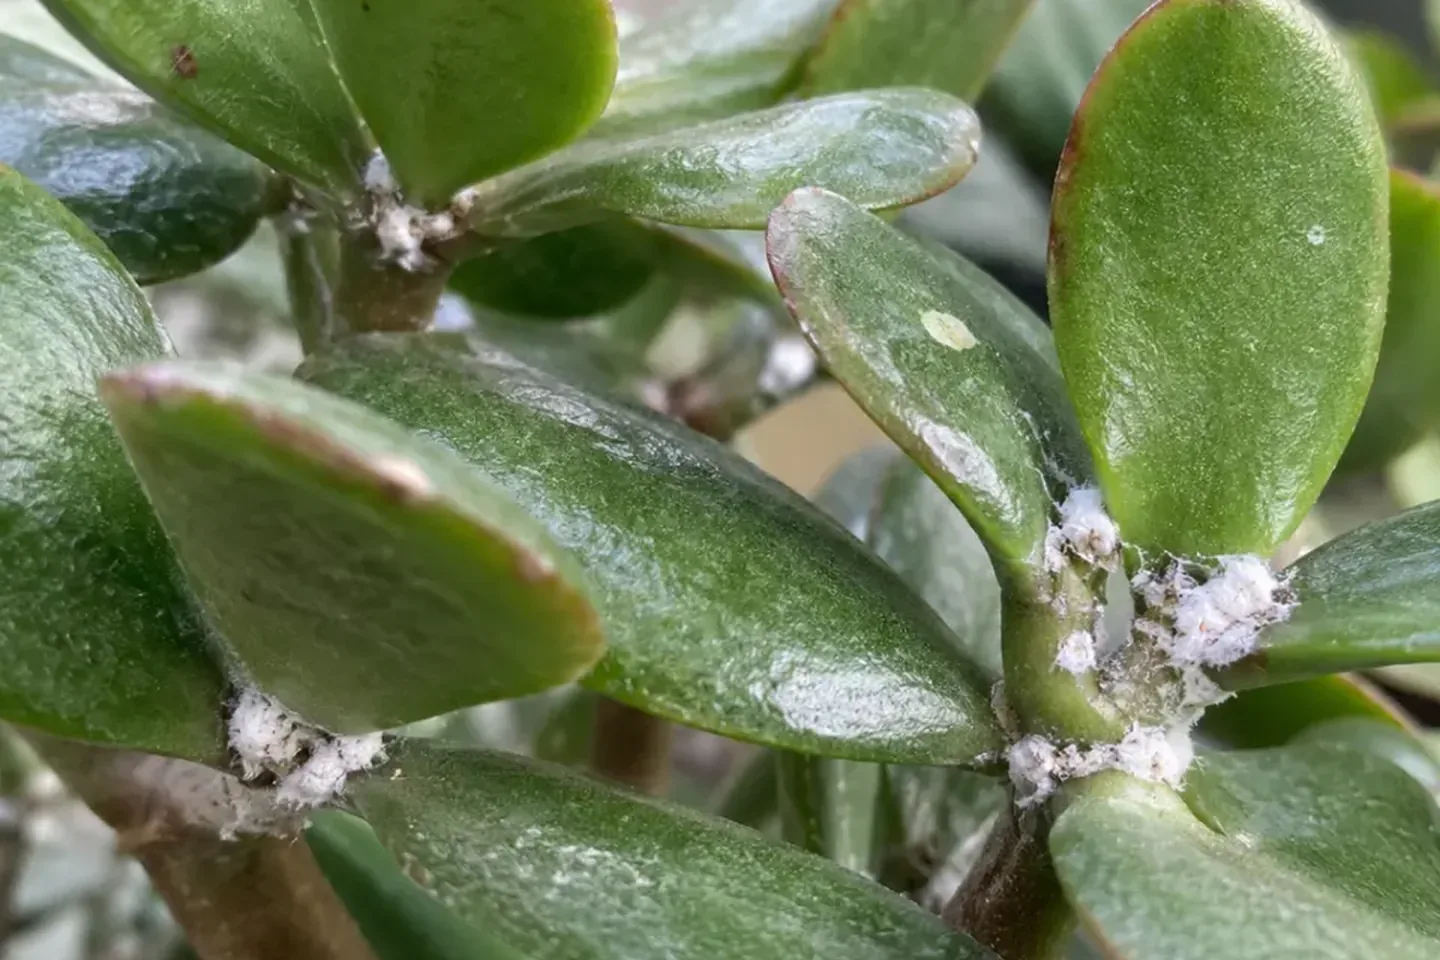
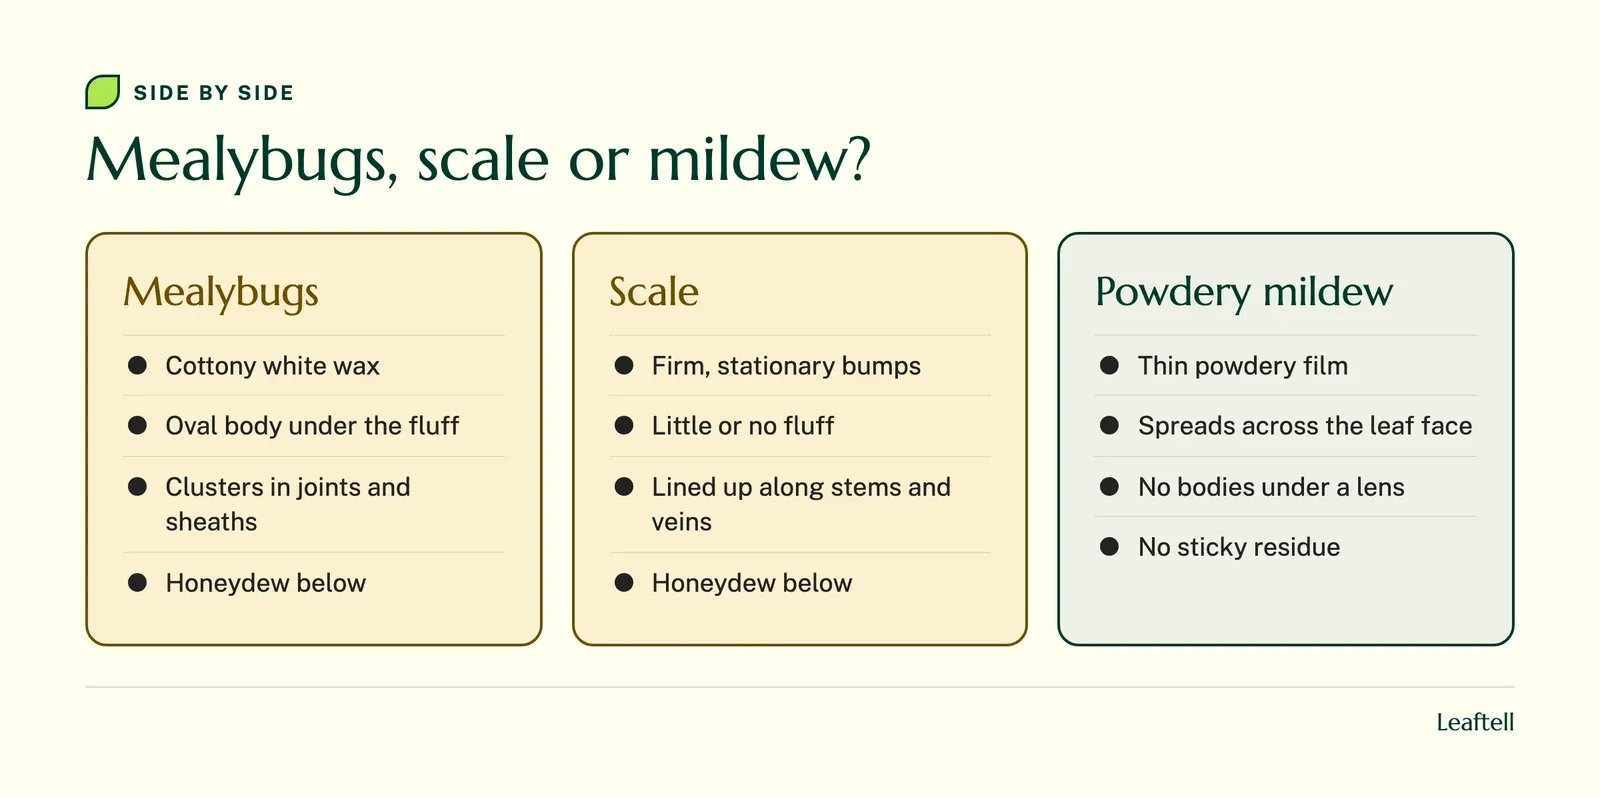
Firmer, stationary bumps that do not look fluffy fit scale insects better. A thin powdery coating spreading across the leaf surface is more like powdery mildew. Small pale insects that move and have no cottony coat need a different identification.
Photograph the close detail and the whole stem before you touch anything. Then check a second joint and the undersides of nearby leaves. One visible tuft is often just the easiest part of a larger colony to see.
| Where you find white material | What to check | First move |
|---|---|---|
| Leaf joint with cottony bodies | An oval insect under the wax | Photograph, then lift off with a damp swab |
| Pot rim or plant support | Hidden insects at contact points | Inspect before you call the cleanup done |
| A joint that was clear on day 1 | New bodies, not leftover wax | Search with a lens at day 7 |
| Broad powdery film on the leaf face | Possibly mildew, not insects | Compare powdery mildew signs |
| Plant declining, nothing visible above | Possible root mealybugs | Get advice before disturbing the roots |
White fuzzy stuff on plants: inspect the hidden crevices
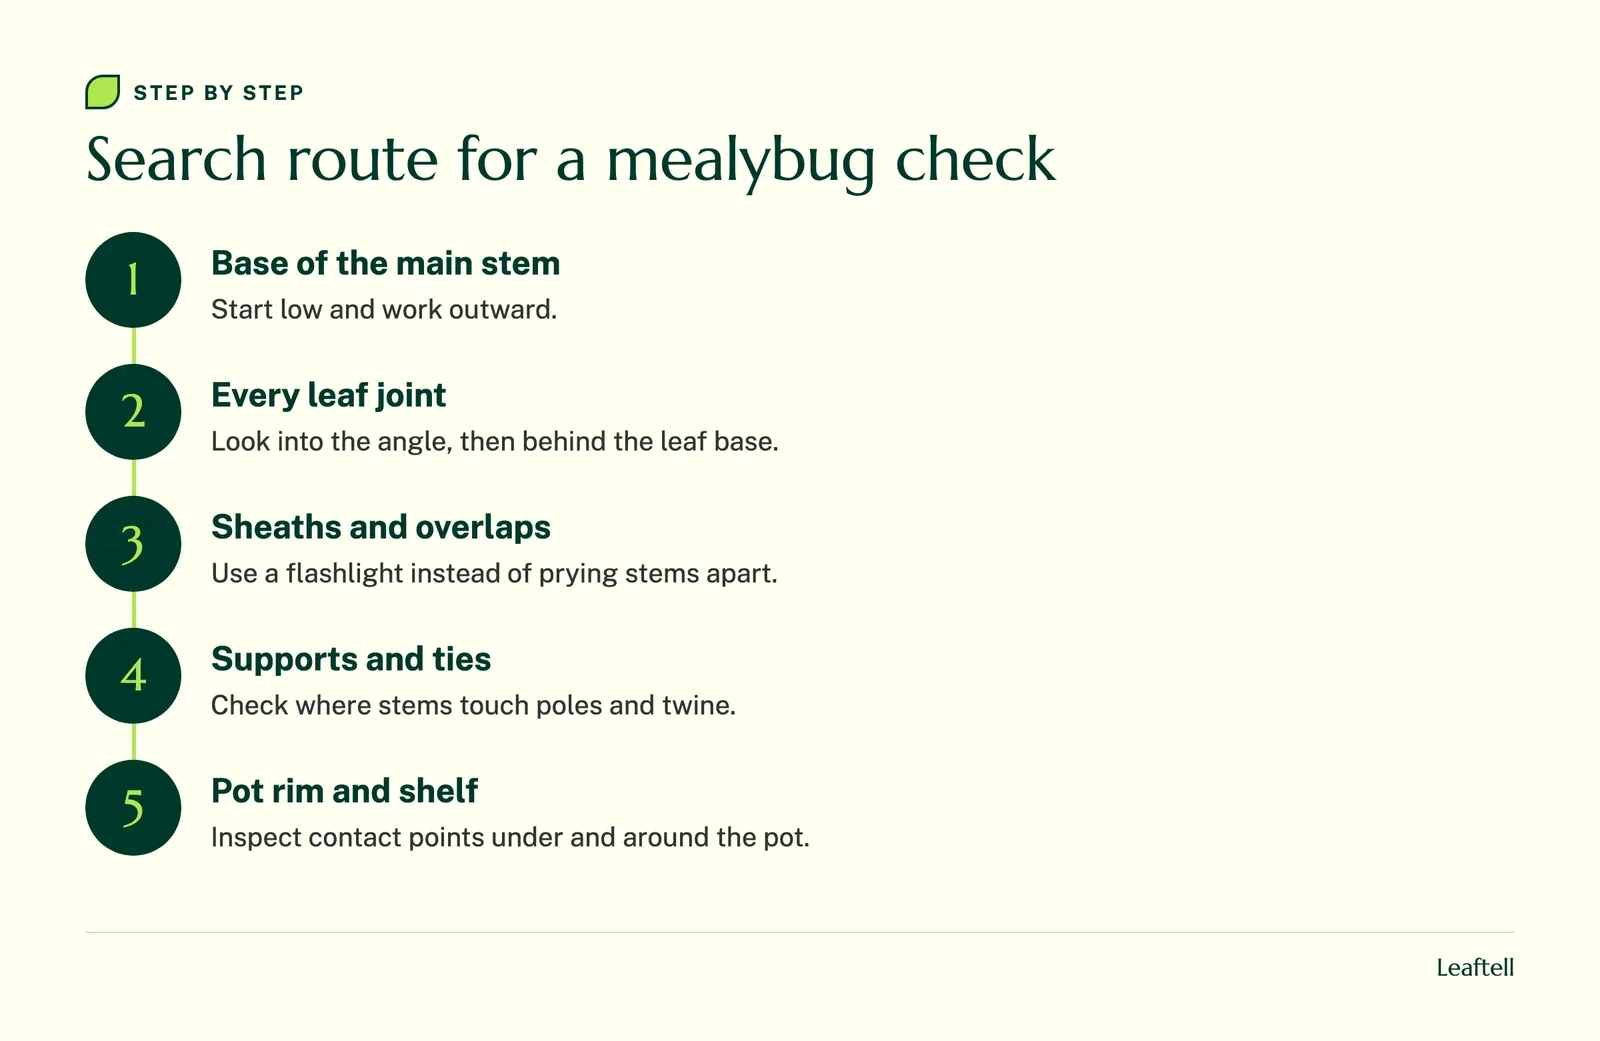
When you find white fuzzy stuff on plants, assume there is more you have not seen yet. Follow the main stem from the base outward and stop at every leaf base, sheath and support tie. The places a quick glance misses are where mealybugs settle.
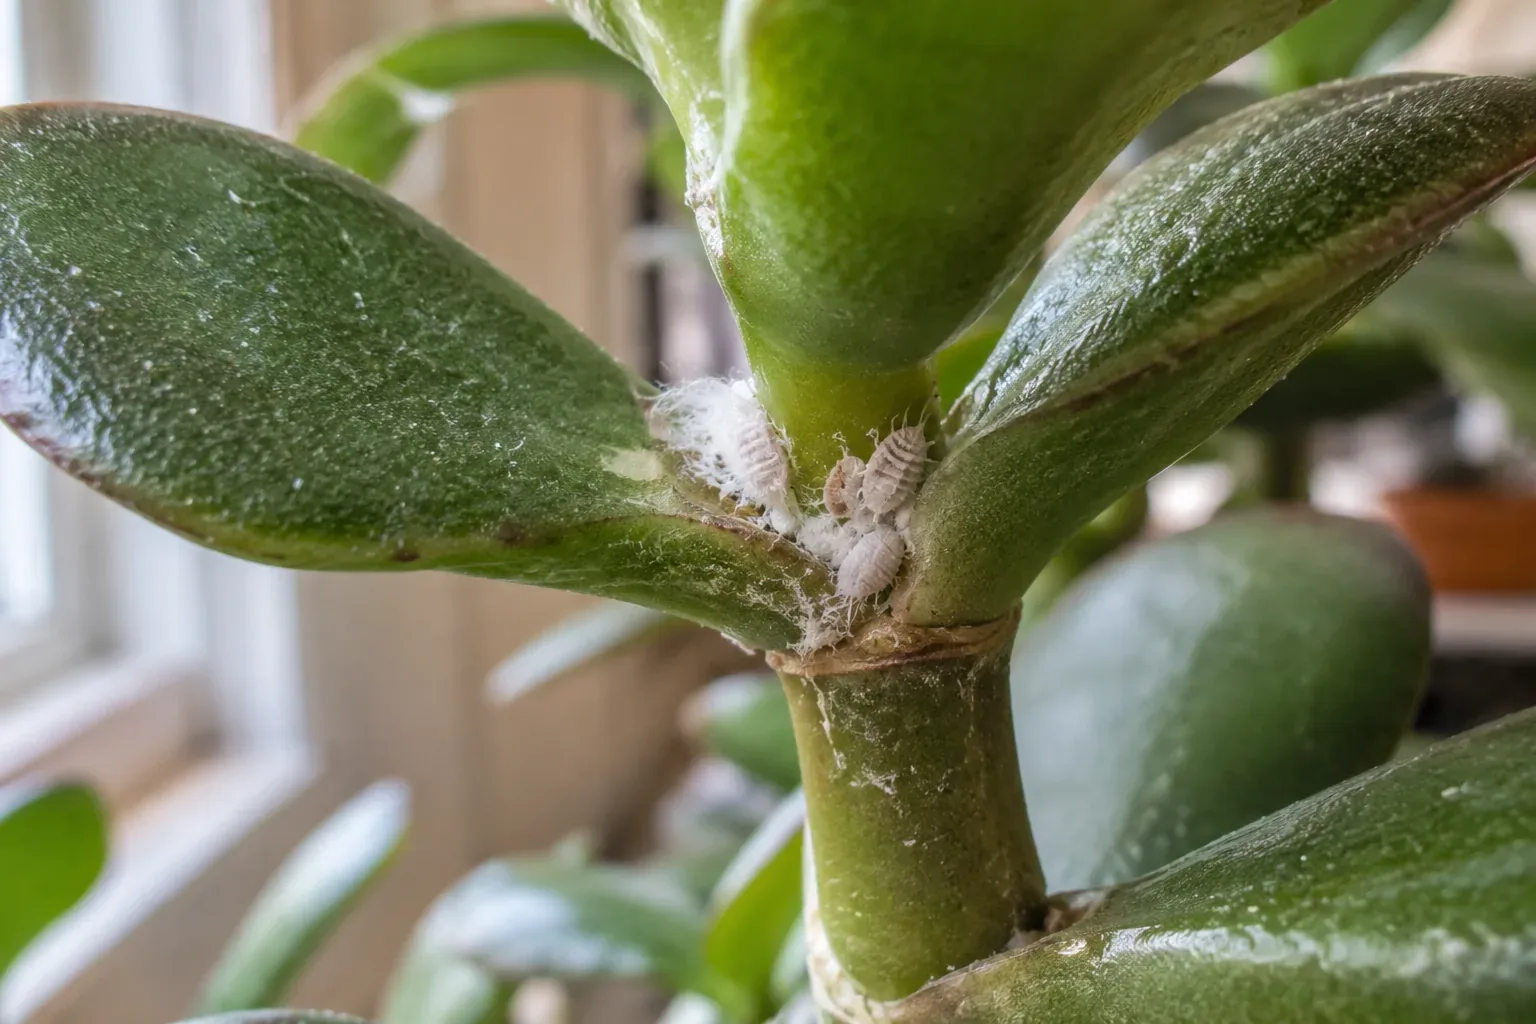
Use a small flashlight to look into dense growth instead of pulling stems apart. Check the underside of the pot, the rim and the shelf, without brushing debris into the next pot. On a trailing vine, trace one stem at a time; pothos care shows how to sort out a crowded container.
Some mealybugs feed on roots, which is a separate investigation. Do not unpot every plant because one joint has a tuft. Look at the roots only when the plant declines with no visible cause above ground, or when an adviser suggests it.
Write down exactly where you found insects. That map is what your follow-up checks will use.
How to get rid of mealybugs: remove the accessible insects
To get rid of mealybugs, start with isolation and careful hand removal. A soft swab or cloth dampened with water lifts accessible insects without scraping the stem. Repeat the inspection after three days, including joints that looked clear, because hidden insects and eggs stay behind after the first pass.
How to remove mealybugs by hand
- Isolate the plant
Move it away from the others and keep it somewhere bright enough for its species.
- Map every colony
Photograph and note each joint, sheath, support or rim spot where you found insects.
- Lift them off gently
Use a damp soft swab or cloth, support the leaf or stem, and switch to a clean swab as it picks up wax.
- Clean the surroundings
Wipe the pot rim and shelf, bag heavily infested cuttings, and wash tools before touching other plants.
- Check again on day 3
Revisit every mapped spot and the nearest clear joints for new bodies.
A gentle rinse suits some plants, but hairy, delicate or tightly rosetted leaves need a lighter touch. Keep rinse water out of the root ball. Do not grind wax into a tender bud to make it look spotless; the scars you leave are hard to tell from pest damage later.
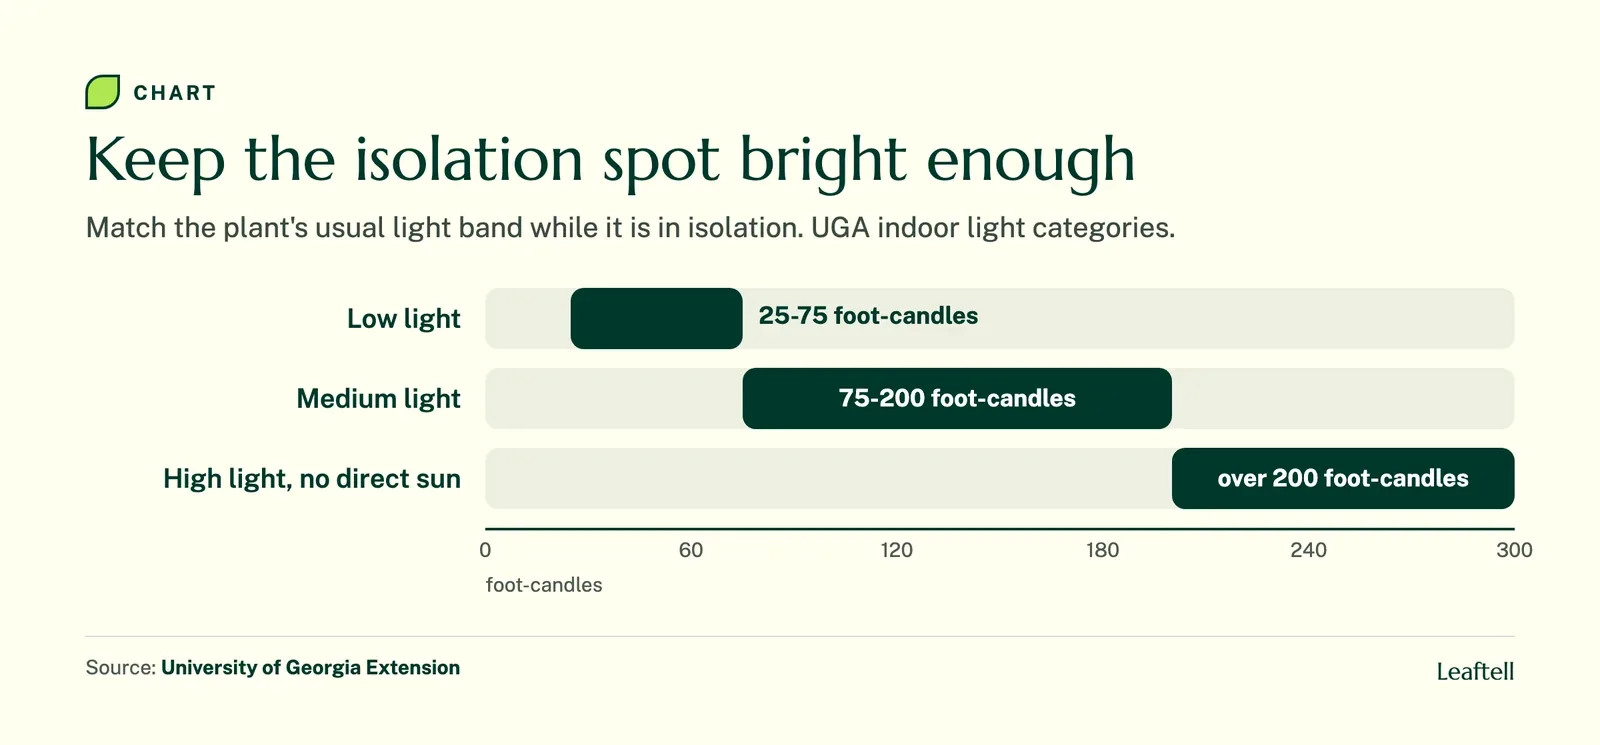
Pick an isolation spot with roughly the same light the plant had before. A dim back room adds stress while you are fighting the pest. Never take cuttings from infested stems to share or pot up with healthy plants. If the insects turn out to be exposed colonies with a different body shape, compare how to get rid of aphids.
Best insecticide for mealybugs: a labeled class, never a homemade mix
The best insecticide for mealybugs is one whose label covers mealybugs, your plant and indoor use, and you only need it when hand removal is not controlling a confirmed infestation. Horticultural oil and insecticidal soap are the usual product classes. Follow the label every time.
The waxy coating and sheltered hiding spots make mealybugs hard to reach. A stronger mix does not fix that; correct identification and thorough, label-permitted coverage do. Test as the label says, write down the product and date, and watch a sensitive plant for injury.
Never mix products, and do not assume a homemade alcohol formula is harmless to every leaf. Do not stack several products in quick succession just because dead white remains are still visible.
Keep supplies, treated leaves and discarded plant material away from pets and children. The ASPCA toxic plant list covers many host plants, but plant toxicity and treatment safety are separate questions. After a suspected exposure, give the vet or poison service both the plant name and the product label. Wash your hands after handling infested material.
Mealybug mistakes and what they cost
The biggest mistake is calling it done when the visible fluff is gone. Hidden insects in sheaths, at the pot rim or on the roots rebuild the colony, and the plant goes back on the shelf to infest its neighbors.
- Treating white residue that cannot move. Old wax stays after insects die. Extra treatments add leaf injury, not control.
- Scrubbing hard. Rubbing tender tissue leaves scars you will later mistake for new damage.
- Unpotting everything. Disturbing every root ball because of one stem colony stresses healthy plants.
- Sharing cuttings from infested stems. You move the colony to a new pot, or a friend's shelf.
- Watering on inspection days. Checking for bugs daily does not mean the plant needs water daily; use a wet-or-dry soil check.
What do mealybugs look like after cleanup?
After cleanup, live mealybugs still look like small oval bodies with white wax, usually back in the same sheltered spots. Old wax and feeding scars do not move and do not grow. Use a lens on your mapped spots and count living insects, not white marks.
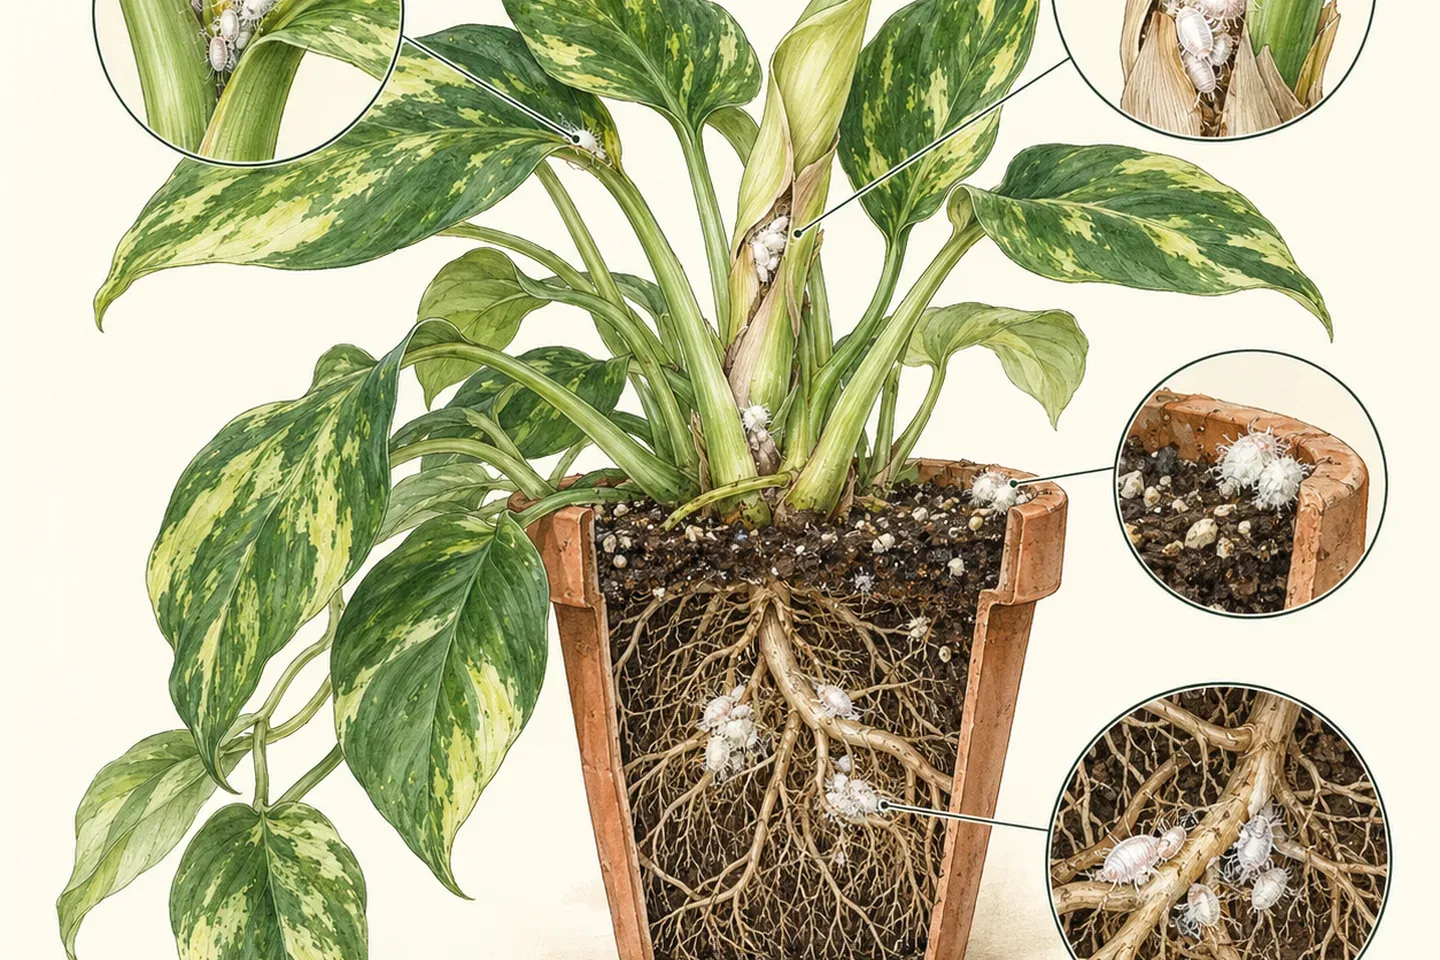
Check the mapped spots on days 1, 3, 7 and 14. On day 1, record every affected joint and remove what you can reach. On day 3, revisit those spots and the nearest clear joints. On day 7, add the pot rim, support and newest leaves. On day 14, compare live insects with your original map before the plant rejoins the others.
These are check-ins, not a treatment schedule. Keep going while you still find living insects. If leaves start dropping, our guide to leaves falling off helps you log the losses without blaming every one on a new outbreak.
What causes mealybugs? Check every new arrival
Mealybugs usually arrive on a new plant, a cutting, or material moved from an infested neighbor. Before a newcomer touches your other plants, check its stem joints, leaf undersides, pot rim and sheltered growth. White wax can hide insects in places you cannot see from above.

Keep a short record of recent additions. It helps you investigate, but it is not proof that the newest plant brought every insect; a small hidden colony may have been there for a while. The houseplant pests guide helps when you find more than one kind of insect.
Map the hiding spots, then keep checking
Confirm the insect under the fluff, isolate the plant, lift off what you can reach, and keep checking the same mapped crevices for at least two weeks. Use a labeled oil or soap only when hand removal is not keeping up, and never a homemade mixture.
Get help when you suspect root mealybugs, when the plant keeps declining despite a careful plan, or when you are not sure what the white material is. Bring photos of the insects and of exactly where you found them. For a badly infested plant with growth you cannot reach, continued isolation or letting it go can protect the rest of your collection. When you are ready, check your mealybug-hit plant in Leaftell with your map and notes.
Sources
Check your growing conditions with the plant watering calculator.
Frequently asked questions
Small oval insects covered in white, waxy, cottony material, usually clustered at leaf joints, along stems or in sheltered crevices. White residue on its own is not confirmation.
They usually arrive on a new plant or spread from an infested neighbor. Hidden clusters in joints or on roots are easy to miss during a first inspection.
Removing them by hand clears the insects you can reach right away. Hidden insects and eggs can remain, so no single cleanup guarantees the colony is gone.
Mealybugs are insects with white waxy coats that cluster in joints. Spider mites are tiny arachnids that leave fine pale stippling and webbing, usually under the leaves.
They mainly damage plants, not people. Keep treatment products and removed plant material away from children and pets, and wash your hands after handling them.
Isolate the plant, remove accessible insects gently, search every crevice and repeat the checks for at least two weeks. Use a labeled treatment only after confirming the pest and checking that your plant tolerates it.
Some mealybugs feed on roots. Consider a root check only if the plant declines without a visible cause above ground, ideally with advice first.
Share article
About the author

Keep checking your plant
Plant care reference
Indoor plant care
Build a routine around your plant, light and potting mix.
Plant care reference
Why is my plant dying
Trace leaf and root symptoms before choosing a care change.
Plant care reference
Pothos plant care
Choose a growing spot and prune a trailing pothos for fuller growth.
Plant care reference
How to fix root rot
Inspect root firmness and drainage, then decide whether to repot.